
YaaS Bites Essentials
YaaS Bites Essentials
The YaaS Bites enable software developers to go from zero-to-YaaS in a couple of days. They are small, focused, incremental coding exercises. Each bite has code, guidelines, and screencasts to ensure your initial journey into YaaS is successful and productive. The bites on this page are essential for learning how to code YaaS solutions. You can find additional bites in the YaaS Bites Overview.
Index
- YaaS Bite: Deploy, call and debug your first web service
- YaaS Bite: Take a web service to the cloud
- YaaS Bite: Code a CRUD web service
- YaaS Bite: Code a multi-tenant CRUD web service
- YaaS Bite: Understand YaaS security: tokens, scopes, and the API Proxy
- YaaS Bite: Code RAML files
- YaaS Bite: Understand the Implicit Grant Flow
- YaaS Bite: Build Packages and Builder Modules
- YaaS Bite: Call other web services
- YaaS Bite: Use the PubSub service
- YaaS Bite: Use Hystrix for resilience
- YaaS Bite: Extend the storefront
- YaaS Bite: Use the YaaS web service SDK
Terminology and Notes
- You should view these bites on large screens as the layout of the bites is suboptimal on small displays.
 : The durations given beside each bite are estimates.
- ⓪ ① ②: Encircled numbers are used to label a concept in a bite, that is then referred to later on in the same bite, using the same encircled number.
- Terminology: The YaaS Landscape has its own set of terms, including: package, client, service, project, and more. As these terms often mean other things to developers, YaaS entities are prepended with YaaS, for example "YaaS package", "YaaS client", "YaaS service".
- The screencasts are silent and show users working through respective bites. They are not stand-alone tutorials, but are there to add clarity, should something be unclear.
- These bites assume you are using Chrome, but any modern browser with developer-tool support is appropriate.
- The deployment steps in these bites are based upon Cloud Foundry, but you are free to use any PaaS offering you like.
- Subtle references to the cultural routes of our YaaS engineers, who come from all over the world, are included in the screencasts of these bites contain. At present there is a Bayerisch, or Bavarian theme. But fear not, new content is coming. Double-click the screencasts to expand them to full screen.

YaaS Bite: Deploy, call, and debug your first web service ~ 1h
Objectives
- Compile, run, and debug a small REST web service and accompanying front-end client.
- Familiarize yourself with the main tools commonly used for web service development.
Before you start, make sure you meet the prerequisites and have cloned the source code as described in the Overview.
Compile and run a web service locally
- Navigate to the
(yb)/essentials/yaasbite100folder. This folder contains a web service and accompanying front-end client. - Compile and package the code into a WAR file: .
- Execute the WAR file:
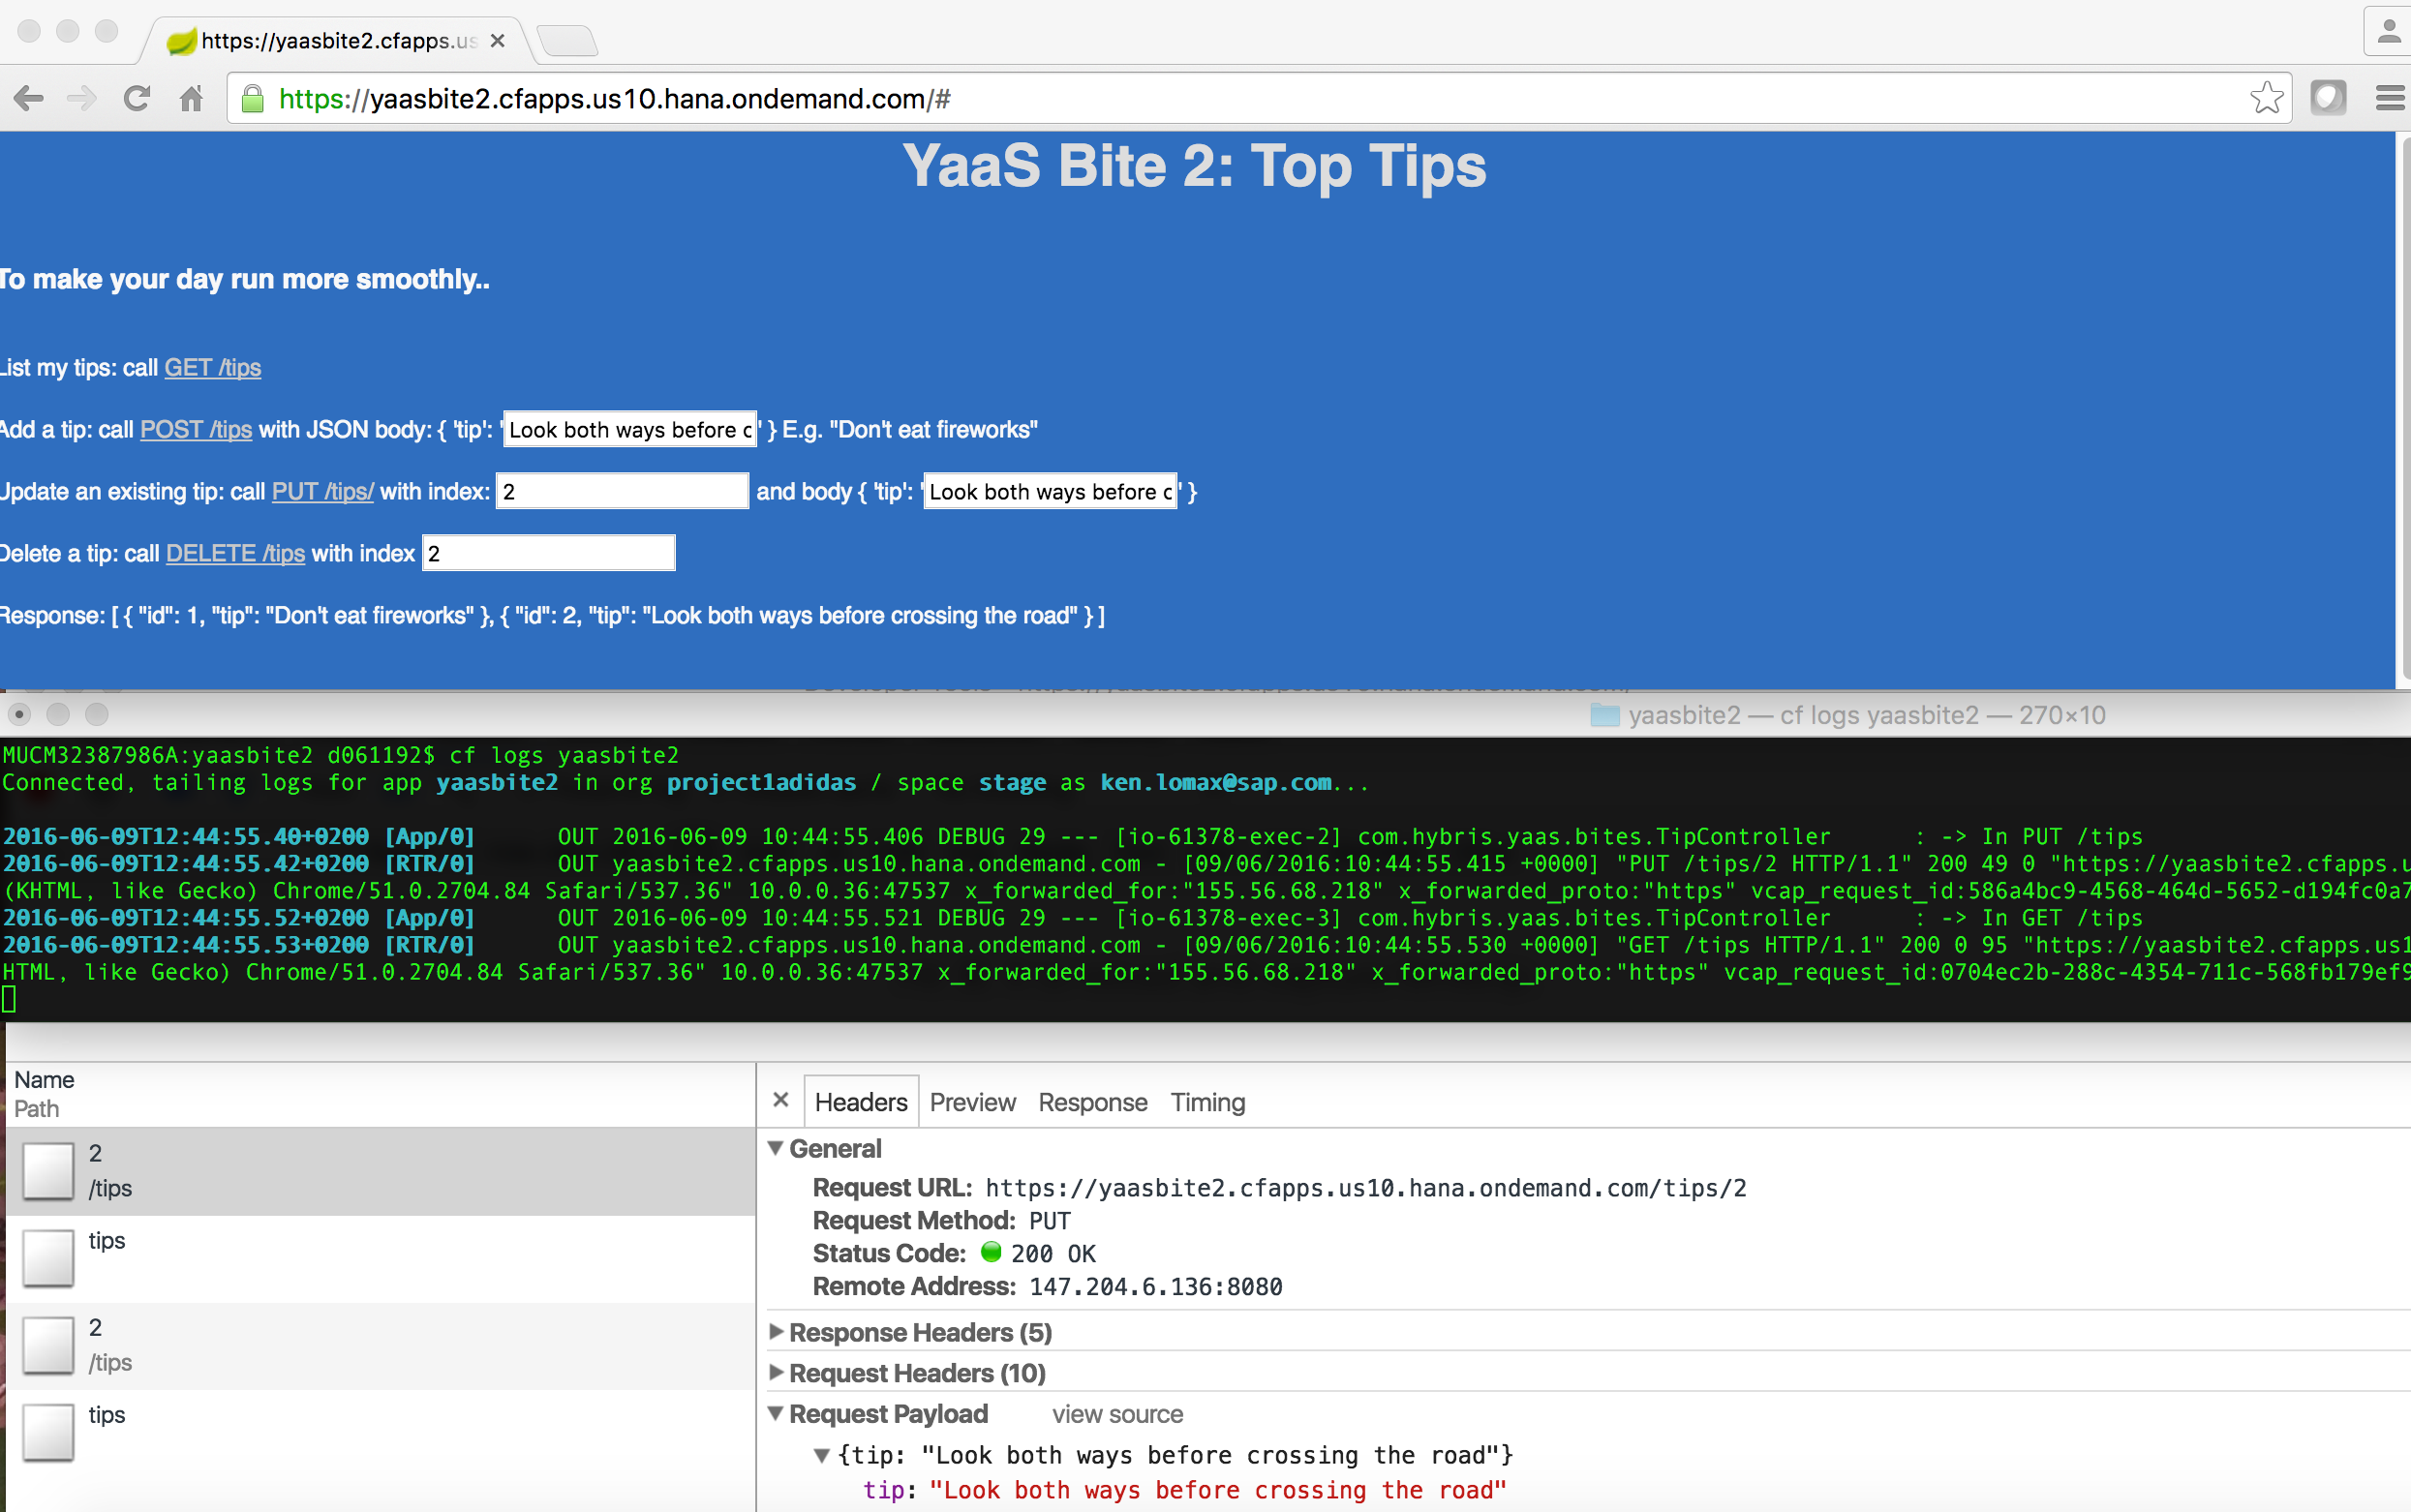
- Open the URL: in a browser window. You see a page with JSON content similar to:
{"id":1,"content":"Greetings from Bayern, Most Honorable User!"}. - In the browser, click View > Developer > Developer Tools, to open Chrome's Developer Tools Window, in which you can observe the HTML traffic.
- Also call the web service with the parameter, and confirm you get the response:
{"id":2,"content":"Greetings from Bayern, Most Honorable Lancelot!"}. - Stop the WAR file with the ctrl-c command.
Bayern Schuhplattler Music |
Debug the web service in Eclipse
- Prepare this Maven project for Eclipse with the command: . In Eclipse, select File > Import > Maven > Existing Maven Project to import the Maven project.
- In Eclipse, select Window > Show View > Problems and verify no errors are listed.
- Find the file
GreetingController.javaand place breakpoints in thegreetingmethod. - Find the file
SanityTest.javain Eclipse, right-click on it, and select Debug As a JUnitTest. - Debug through the code to understand the following:
- The test uses Spring's
TestRestTemplateto call http://localhost:8080/greeting. - Spring routes this call to the method or endpoint annotated with
@RequestMapping( "/greeting" ). - Spring marshalls and unmarshalls the data between Java and JSON automatically. Read more on Spring, JSON, and Rest on the Spring website.
- The test uses Spring's
- Stop the debugger before proceeding to the next step.
Debug the live web service remotely
In addition to running and debugging services directly in Eclipse, you can debug "live" web services, running outside of Eclipse.- Execute the WAR file in debug mode:
- In Eclipse, select Run > DebugConfigurations > RemoteJavaApplication > New.
- Specify the same port (5005) and click Debug. The debugger for Eclipse launches and attaches to the running web service.
- Verify that you hit any breakpoints you place in the web service's code, when you access the live web service's endpoints via the front-end client at and .
Keep your Eclipse Debugger session active and your web service running, to also hit break points when you use the cURL command, as described next.
Using Postman and cURL
Chrome's Postman and the command line tool cURL are useful for manually sending REST calls to a web service. If you do not yet have cURL installed download it now. Use Chrome's Developer Tools to observe some of the REST requests made from your front-end client to the web service, and replicate some of those calls manually using Postman and cURL. For example:- Run to replicate a browser's POST request.
- Run to include the field
name, and to request headers in the reply.
Before going further
- Study and understand the code in this bite.
- Understand that this bite has both a web service and a separate front-end client. Often, you deploy a web service separately to the client, but in this case, they are in the same WAR file.
- The web service does not "know" that the client is in the same WAR file. For all the web service knows, the client is on another machine, developed by other developers. This topic becomes highly relevant when addressing security in a later bite.
- Use Chrome's Developer Tools to watch and understand the HTTP traffic traveling between the front-end client and the web service back end. You need a firm understanding of what is happening here before going further.
YaaS Bite: Take a web service to the cloud ~ 2h
Objectives
- Set up a cloud account.
- Use Cloud Foundry's CLI to deploy your web service and to view any logs it generates.
- Perform your first successful steps in the cloud.
Should you already be a member of a YaaS organization, and have a cloud-deployment process in place, you can skip straight to Adjust, deploy, and run in the cloud. The next steps describe how to set up an account on Cloud Foundry. But you can choose which ever PaaS offering you prefer.
Set up an account on the SAP Cloud Platform
Activate a free account on the SAP Cloud Platform, and push a web service to it:https://api.cf.eu10.hana.ondemand.com. Next, provide this endpoint when setting up your Cloud Foundry CLI.Set up your Cloud Foundry CLI
Set up your Cloud Foundry CLI to runcf commands from the command line:- To download and install the CloudFoundry CLI , follow the Installing the cf CLI instructions on the website.
- Verify a successful installation with the
cf -vcommand, which returns the version number. - Point your Cloud Foundry CLI to the SAP Cloud Platform endpoint with the
cf api yourEndpointcommand. For example:cf api https://api.cf.eu10.hana.ondemand.com.
Adjust, deploy, and run in the cloud
- Familiarize yourself with the manifest.yml file. This file instructs Cloud Foundry where and how to deploy the WAR file. For more information, see Deploying with Application Manifests.
- Specify a unique value for the name attribute in the manifest.yml file. This appears in the URL to your WAR file in the cloud and should be unique, for example,
yourAppName⓪. - Build and package the WAR file again with this new name: .
- To push the WAR file to the cloud, run . This command uses the information in manifest.yml to guide the deployment.
- Run , to check that your WAR file is deployed. Take note of the URL ① where the web service is running, such as:
yourAppName.cfapps.us10.hana.ondemand.com - The default SAP Cloud Platform settings require the secure, HTTPS protocol. Therefore, you must use HTTPS for all calls to your deployed web services, and when accessing your website in the cloud at https://①.
- Use the `cf` command to observe the logs from the cloud. Confirm that you can see the log output as expected from
GreetingController.javawhen you hit the web service in the cloud at https://①.
YaaS Bite: Code a CRUD web service ~ 1h
Objectives
- Compile, deploy, and run a small CRUD (create, read, update, and delete) web service and an accompanying front-end client.
- Use some basic Angular and Restangular.
- Understand the REST traffic.
- Verify with a sanity test.
Compile and run the CRUD web service locally
- For this bite, navigate to the
(yb)/essentials/yaasbite200folder. - Compile and package the bite into a WAR file:
- Prepare this Maven project for Eclipse with the command . Then in Eclipse, select File > Import > Maven > Existing Maven Project to import this as a Maven project.
- In Eclipse, select Window > Show View > Problems and verify there are no errors listed, and explore the code.
- Run the web service locally:
- Access the front-end client at , where you can try the ping link and CRUD options.
- Use Chrome's Developer Tools to watch and understand the HTTP traffic traveling between the front-end client and the web service back end. You need a firm understanding of what is happening here before going further.
- If you are not yet familiar with Angular and Restangular, study the code used in index.html, and these excellent Angular and Restangular resources.
Deploy and run in the cloud
- Adjust the name attribute in the manifest.yml to be unique, for example
yourAppName⓪. - Build the WAR file again with this command: .
- Push to the cloud with the following command: .
- To check that the deployment is successful, and that the web service has started, use the command. Take note of the URL① where the web service is running, such as:
https://yourAppName.cfapps.us10.hana.ondemand.com - Open the URL① in Chrome and view the REST Traffic that occurs when you perform the CRUD operations.
- Use the to look at the logs that appear when you perform the CRUD operations.
Before going further
- Study and have a basic understanding of the code used:
- Spring Web (in TipController.java)
- Spring Boot (in Application.java)
- Restangular calls with success and error handling (in index.html)
- JUnit (in SanityTest.java)
- Spring JPA, H2Datase (in pom.xml, TipsRepo.java, and Tip.java)
- Logging (set in application.properties and used in TipController.java)
- Watch and understand the REST traffic requests and responses.
YaaS Bite: Code a multi-tenant CRUD web service ~ 2h
Objective
- Understand the meanings of multi-tenancy and multi-tenant.
- See an example of a multi-tenant web service in action.
Compile and run the multi-tenant CRUD web service locally
- For this bite, navigate to the
(yb)/essentials/yaasbite300folder. - Compile and package into a WAR file: .
- Prepare this Maven project for Eclipse with the command . Then in Eclipse, select File > Import > Maven > Existing Maven Project to import this as a Maven project.
- In Eclipse, select Window > Show View > Problems and verify that you see no errors listed. Explore the code.
- Run the web service locally:
- Hit the website at .
- Perform the standard CRUD options on the web page, using various tenants (for example, TheAmazingCompany and TheEvenBetterCompany).
- Observe how each tenant's data is kept separate from other tenants' data. This is the essence of multi-tenant software: One tenant cannot read, modify, or delete tips that belong to another tenant. In this bite, this is implemented by including the tenant name in the URL, which then gets picked up in
TipControlleras the parameter@PathVariable String tenant. This is just one way to support multi-tenancy. - In this example, the Get all tips method has a corresponding link in the front end that retrieves data from all tenants.
- In a Chrome browser, click View > Developer > Developer Tools and observe the REST calls being made behind the scenes.
Deploy and run in the cloud
- Adjust the name attribute in the manifest.yml to be unique, for example
yourAppName⓪. - Push to the cloud: .
- Check that the deployment was successful using the following command: . Take a note of the URL① where the web service is running, such as:
https://yourAppName.cfapps.us10.hana.ondemand.com - In a Chrome browser, access the website URL①.
- Look at the REST Traffic that occurs when you perform the CRUD operations and understand how the tenant data is kept separate.
- View the logs that appear when you perform the CRUD operations: ⓪.

Optional: problem to solve
- Find at which length a tenant name causes SQL errors to occur, and modify the code to avoid these errors.
YaaS Bite: Understand YaaS security: tokens, scopes, and the API Proxy ~ 4h
Objectives
- Understand how Security is enforced and supported in YaaS.
- Learn the various YaaS entities related to security including: tokens, scopes, required scopes and API Proxy.
- See tokens and scopes in action with your web service.
- Understand all elements in this reference diagram:

Compile, run, and deploy the web service and client
- For this bite, navigate to the
(yb)/essentials/yaasbite400folder. The code for this bite has a web service and front-end client, written to demonstrate YaaS security. The first step is to get that web service running. - Compile and package the bite into a WAR file: .
- Prepare this Maven project for Eclipse with the command . Then in Eclipse, select File > Import > Maven > Existing Maven Project to import this as a Maven project.
- In Eclipse, select Window > Show View > Problems and verify there are no errors listed, and explore the code.
- Adjust the name attribute in the manifest.yml to be unique, for example
yourAppName⓪. - Push to the cloud: . If you see an "exceeded memory" error, delete one of the other web services you pushed to your cloud space, using the
cf deletecommand, and then push your web service again. - Use the command to verify the web service is running. Take note of the URL① where the web service is running, such as:
https://yourAppName.cfapps.us10.hana.ondemand.com - Verify that you can reach the URL① in a Chrome browser through HTTPS.
The API Proxy: Identify the caller
Currently, the web service doesn't know the caller's identity. In many cases, the identity is determined by the front-end web pages, or other web services. In YaaS, a caller identifies itself with an access token, which is a string similar to 024-ca055b94-7e26-4e82-b0fe-7ea95b98a2a7 that the caller embeds in the header of each HTTP request sent. The header looks similar to the following:Authorization: Bearer 024-ca055b94-7e26-4e82-b0fe-7ea95b98a2a7.In YaaS, the API Proxy is a proxy server which validates the access token included inside an HTTP request, before either sending the request on to its intended web service (endpoint), or rejecting it. The API Proxy needs to identify:
- The address of your web service
- Any conditions of the HTTP request it needs to reach its intended endpoint
Registering your web service in YaaS
Register your web service in a YaaS service which resides in a YaaS project. A YaaS project resides in a YaaS organization.
- Open your YaaS organization and select the YaaS project you created earlier.
- Within your YaaS project, click +Service to add a YaaS service.
- Enter your cloud URL① in the field Source URL. You must use the HTTPS protocol.
- Click Deploy to activate this YaaS service.
- Note the Generated Proxy URL ② that the YaaS builder assigns to your YaaS service: such as https://api.eu.yaas.io/yaasgulps/sdf/v1.
- The Generated Proxy URL points to the root of your web service, so call the yourServiceProxyURL/tips endpoint. For example: https://api.yaas.io/yaasgulps/sdf/v1/tips ③.
- Wait a few minutes for the proxy address to activate. Then verify that when you access the endpoint ③ in Chrome, you do not get a
404, but do get the messageUnauthorized: Bearer TOKEN is missing. This shows that the API Proxy is doing its job - blocking any calls intended for your web service that do not have a valid access token in the header. You can still access your web service directly at its own cloud URL ①, but this is not the URL you share with or permit from others. - Next, you acquire an appropriate access token. Then you contact your service both directly, and by using the API Proxy, with and without an access token.
Adjust the URLs in your client
For this bite to work, the client index.html, needs to know the three locations where it can access your web service: locally, in the cloud, and in the cloud through the API Proxy.- Search for "NEEDS_ADJUSTING" in index.html, to find the three URLs that need adjusting to match your scenario, and make the adjustments:
LOCAL_URLis okay as-is, unless you changed the ports from the defaults.CLOUD_URLmust match your web services URL ①.SERVICES_API_PROXY_URLmust match your Generated Proxy URL ②.
- Rebuild your WAR file: .
- Redeploy to the cloud: .
Get an access token for your front-end
If you want your front-end client to make REST calls that successfully reach your web service via the API Proxy, you need to get an access token. To generate an access token, you need to send a Client ID and Client Secret to the OAuth2 service. Client IDs and Client Secrets belong to YaaS clients, which you create within a YaaS project.- Open your YaaS project.
- Click +Client to create a new YaaS client. For now, you don't need to select any scopes.
- Save your YaaS client.
- Click Show in the Client Authorization section of your YaaS client page, and copy the values of the Client ID and Client Secret ④ that belong to, and uniquely identify, this YaaS client.
- Your web service should now be running in the cloud. In addition, run your web service and site locally:
- Access the local instance of your web service's front-end: .
- Enter the Client ID and Client Secret ④ you retrieved. Leave the Requested Scope field empty.
- Request a YaaS token using the link in your web service's front-end.
- Study the token's details that are then displayed in your front-end, which should contain:
- The access token itself.
- A tenant, on whose behalf you intend to make calls using the access token. By default, the tenant is the YaaS project to which the identified YaaS client belongs. When you start wiring more web services together, you'll see that you can specify another tenant when requesting the token. Just remember, the tenant does not necessarily identify who makes a call, but instead on whose behalf you make a call. This is critical to understand.
- Scopes, or special permissions, granted to the access token, which in this case is empty.
Call the web service with the access token
- Now that you have entered an access token in your front-end, your UI should have expanded to show:
- Details of the token
- The CRUD interface
- Radio buttons to call the web service: locally, in the cloud, in the cloud via the API Proxy
- Radio buttons to include or exclude the token in the HTTP requests
- Try to call the web service using all of the variants listed and study the resulting REST Traffic.
- When you ping the web service using the API Proxy with a token included in the header, note that the API Proxy converts that token into a set of request headers that the TipController picks up. In particular, note
hybris-tenant, which the API Proxy sets to the token's tenant. - Understand that the API Proxy does not allow any calls through unless you include the token. Additionally, you cannot access the method
sensitiveMethodForVIPsOnlybecause you are missing a certain restricted scope in your token. These are addressed next.
Scopes and required scopes
When you request a token, you can also specify a list of scopes that you want the token to contain. Scopes are just strings that denote permissions, and each YaaS service is free to create any number of scopes. For example, according to the Document service documentation, calls to the Document service require a token with one or more of the scopes hybris.document_view, hybris.document_admin, and hybris.document_manage, depending on the call you want to make.You could not call
sensitiveMethodForVIPsOnly because you did not have the required scope in your access token. You can locate the respective method in TipController. Examine that method and you can see that the call was rejected because the token did not contain the scope hybris.tips_vip, which is required in the access tokens of callers to this method.- To allow your YaaS client to aquire a token with this new scope, you need to do two things:
- Add a new scope hybris.tips_vip to the list of the YaaS service's own scopes.
- Add this new scope to the YaaS client's list of Required Scopes.
- Navigate to your front-end and use your YaaS client's credentials to acquire a token with the new scope hybris.tips_vip.
- Verify that your browser can now call
sensitiveMethodForVIPsOnlywith this new token, and it does not return an error code as before.
Understanding scopes is critical to using YaaS successfully. Read through this section and repeat the instructions until you are confident that you understand the concepts discussed. The Dev Portal also contains a comprehensive discussion of YaaS' security model.
YaaS Bite: Code RAML files ~ 2h
Objectives
- Understand what RAML files are, and how they are used to specify REST APIs.
- Understand how to test, and work with RAML files.
Background
The Dev Portal explains why and how YaaS uses RAML to describe web service APIs. In this bite, you explore a small RAML file and accompanying tests that validate the RAML's syntax and confirm that calls from the test methods to the web service match the RAML definition exactly. When you create a web service later using the YaaS SDK, you learn that the SDK takes a RAML file as its starting point, or source of truth, and generates an entire skeleton Java/Jersey web service (including endpoint, tests, and DTOs), all extrapolated from the api.raml file. If you are completely new to RAML, a good resource for learning the basics is the raml.org tutorials.Validate the RAML syntax with tests
- For this bite, navigate to the
(yb)/essentials/yaasbite500folder. - Compile and package the WAR file: .
- Prepare this Maven project for Eclipse with the command . Then in Eclipse, select File > Import > Maven > Existing Maven Project to import this as a Maven project.
- In Eclipse, select Window > Show View > Problems and verify there are no errors listed, and explore the code.
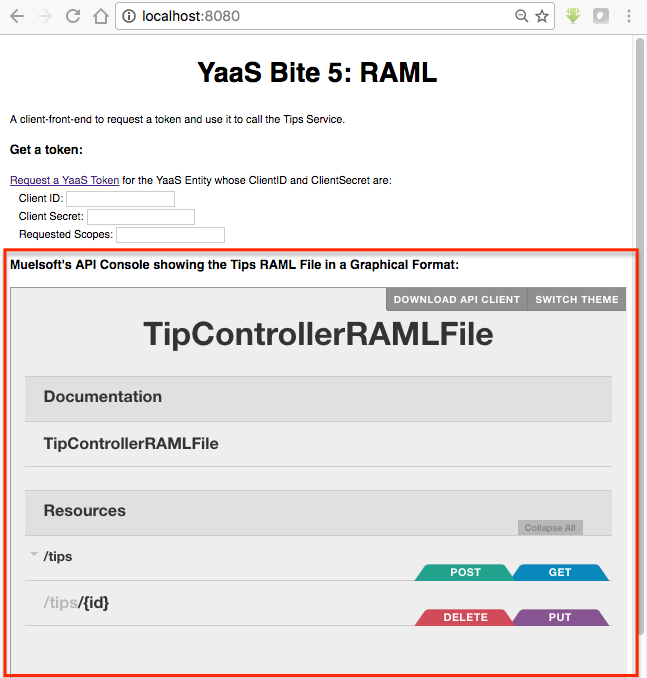
- Find the RAML file api.raml, and look at how the RAML content describes the REST API for TipController in a concise syntax.
- Use the MulesSoft API Console to display the RAML file in a more interactive manner, and to see the API Console embedded as a frame in index.html.
- Run the web service locally: .
- Hit the front-end at .
- Explore the RAML API Console that appears below the CRUD interface. This API Console is the same as the one used to document the YaaS web service APIs at devportal.yaas.io/services.
- Explore the SpringTest.java file, which shows one way to validate your RAML, as well as how to validate that the calls you are making in your tests cover all of the API described in the RAML file.
YaaS Bite: Understand the Implicit Grant Flow ~ 4h
Objectives
- Understand what the Implicit Grant Flow is and how it allows you to keep the Client Secret secret
- Understand the main steps the Implicit Grant Flow follows.
Background
In previous bites, you retrieved a token by providing Client ID and Client Secret to the OAuth2 service. This is an important way to request tokens, but it requires using the Client Secret, which is supposed to be kept ... secret. So, while you can use this approach to request tokens between web services on the back end/server side, you need a different approach that does not require the Client Secret when you request a token from a front-end client (for example a web page). This second approach is called the Implicit Grant Flow.Below you can see that when you use the Implicit Grant Flow, you redirect visitors who are accessing your front-end, to a login page where they must enter their YaaS account credentials. Once validated, the flow redirects them again to your front-end, but this time with an access token embedded in the URL. Your front-end code can then extract the access token and use the token for its calls.
Sign in with Implicit Grant flow
- For this bite, navigate to the
(yb)/essentials/yaasbite600folder. - Adjust the name attribute in the manifest.yml to be unique.
- Compile and package the WAR file: .
- Push to the cloud: .
- Find and take a note of the URL ① where your front-end is running in the cloud.
- Register your web service in YaaS:
- In your YaaS project, create a new YaaS service, and point that YaaS service to your web service's cloud URL ①.
- Click Deploy to active the proxy address(es) that the API proxy reserves for your service.
- Take a note of the proxy URL ② generated for your new YaaS service.
- Create a new YaaS client for your YaaS service:
- In the Builder, locate your YaaS service and click +Client to add a YaaS client to this.
- Take a note of the Client ID ③ of this new YaaS client. You do not need the Client Secret.
- The Implicit Grant Flow logic needs to know the URL to which the user should be redirected upon successful authentication. In this case, that URL should be the index.html of your service on the cloud: ①/index.html, such as https://yaasbite6.cfapps.us10.hana.ondemand.com/index.html. Add this address to the empty list of Redirect URIs in your YaaS client.
- Search for "NEEDS_ADJUSTING" in the bite's code, and make these adjustments:
- Adjust the
SERVICES_API_PROXYto point to the proxy for your YaaS service ②. - Adjust the
SERVICES_CLOUD_URIto point to your web service's address in the cloud ①. - Adjust the
Client IDto your YaaS client's Client ID ③. - Find the Angular method
loggingInand study what that method does: - When you access index.html in a browser for the first time, the
loggingInmethod redirects to the OAuth2 endpoint. - The OAuth2 endpoint opens a pop-up window asking the user to sign in with their YaaS credentials.
- You passed a redirect_uri parameter to this endpoint that specifies your homepage and your client's Client ID. If the parameters passed do not match your client's redirect_uri and Client ID, the Implicit Grant flow fails, even if the username and password are valid.
- Note that you did not include the Client Secret parameter anywhere, which is a good thing, and a feature of the Implicit Grant flow.
- If the username and password are authenticated, the OAuth2 endpoint redirects to the redirect_uri parameter you specified, and appends to that the value of the access_token
- The
loggingInmethod is invoked again, but this time, because the URL includes the access token, the JavaScript follows a different branch in the source code; the web service retrieves the access token from the URL, and can use the token to make calls to your YaaS service's proxy URL. - Try out the Implicit Grant Flow:
- Package the code: .
- Push to the cloud: ).
- In a Chrome browser window, access your website's URL ①. This invokes the
loggingInjavascript method. - Be aware that the browser may be blocking a pop-up window that should now appear. If so, adjust your browser settings to allow pop-ups for the site.
- After successfully signing in, you should see a valid access token in the URL
- Find the javascript that then extracts that token, to then use to perform basic CRUD operations.
- Using the Implicit Grant flow, you received a token with the required scopes, without having to provide the Client Secret anywhere.
- When you examine the call you made to the OAuth2 service from index.html, you can see that the client requests the hybris.tips_vip scope, but the token did not acquire the scope. This is because your YaaS web service and client do not list the scope.
- For more practice, add the hybris.tips_vip scope to your YaaS service and to the list of required scopes in your YaaS client. When you sign in again, your token should acquire the scope hybris.tips_vip, allowing you to call
sensitiveMethodForVIPsOnlyfrom the front-end.
YaaS Bite: Build Packages and Builder Modules ~ 4h
Objectives
- Understand what YaaS Packages and Builder modules are, and how they are created and used.
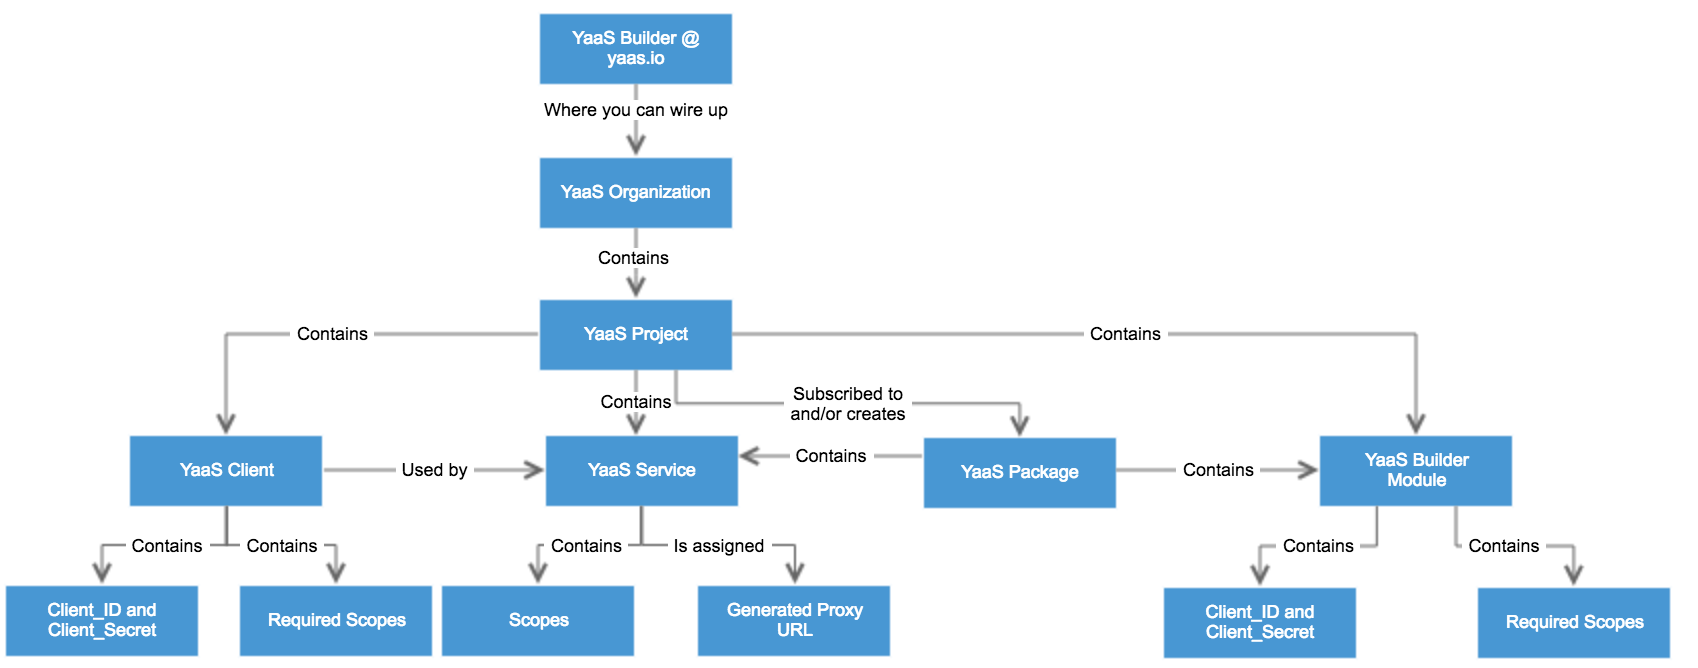
- The following reference diagram, may help you when working through this bite.
Background
Once you have developed a YaaS service, you might want to share it with your colleagues. To do this, you can wrap the service into a YaaS package. A YaaS package is uniquely identified by its ownVersion ID, a string similar to 57da987b2b1876901dc3e26f. If you supply this Version ID to other developers, they may subscribe their own YaaS projects to your YaaS package by clicking a "+ PRIVATE PACKAGE" button and adding that Version ID. Once subscribed, those developers can call and utilize your YaaS service.In addition to including YaaS services, a YaaS package can also include Builder modules, which provide a back end, or administrative, user interface for your service. When other users subscribe to your YaaS package, they can access this UI via a new menu entry that appears in their own YaaS builder.
You can create Builder modules from scratch using the YaaS Builder SDK CLI, which you can download on the Dev Portal. In this bite, you create a Builder module from existing example code instead of from scratch.
Create a Builder module, register it in YaaS, and add it too to your YaaS package
- For this bite, navigate to the
(yb)/essentials/yaasbite700folder, which features a heavily stripped-down Builder module for the Tips service. - This Builder module simply lists the current tips. Find the corresponding RESTangular call.
- Search for and modify all entries marked with "NEEDS_ADJUSTING".
- Rebuild the code: .
- Push it to the cloud: .
- Use to show the location where the web service is deployed ①. The location looks similar to:
yaasbite7bm.cfapps.us10.hana.ondemand.com. - Confirm that the Tips service from the YaaS Bite Code a CRUD web service is deployed and running in the cloud, then add some tips to it.
- Create and register a Builder module in YaaS that provides a back end user for the Tips service.
- In your YaaS project, select Builder Modules from the menu, and create a new one.
- In the Module Location add the URL of your Builder module's JSON file. This is equal to the URL ①
/builder/module.json, similar to:https://yaasbite7bm.cfapps.us10.hana.ondemand.com/builder/module.json. - Enable Use this Builder Module for my project by using the toggle button.
- Save the Builder module, and a new menu entry appears in your YaaS Project.
- Select the new menu entry and Get all Tips displays on the right of your YaaS Project.
- Select Get all Tips and an angular call is made to the Tips service, which lists all the tips in the Builder module's UI.
YaaS Bite: Call other web services ~ 2h
Objectives
Understand how to make calls to other YaaS services from your own web service.Background
In this bite, you start using services that are available on the YaaS Market. In particular, you modify your persistence logic to use the Document service, rather than in-memory logic. You can find the Document service on the YaaS Market, in the Persistence (Beta) YaaS package.Steps
- For this bite, navigate to the
(yb)/essentials/yaasbite800folder. - Explore the code which includes logic to acquire access tokens, and to invoke the Document service, using two new classes:
OAuthWrapper.java, to acquire access tokens by calling the OAuth2 serviceDocuServiceWrapper.java, to make the appropriate REST calls to the Document service
- Adjust the name attribute in the manifest.yml to be unique.
- You need to make some adjustments to your web service before it is functional, but one of these changes requires knowing to where your web service is going to be deployed - meaning there is a chicken-and-egg situation. For now you can package, then deploy your not-yet-finalized web service, by skipping its tests during its packaging cycle. Run to do this.
- Push to the cloud: .
- Use to note the URL ① to where your web service was deployed .
- In the YaaS Builder, open your YaaS project:
- Subscribe to the Persistence (Beta) YaaS package.
- To wire the web service into YaaS, create a new YaaS service in the Builder and specify the deployed URL ①, using the HTTPS prefix, as the Source URL.
- Take a note of the proxy address that the Builder assigns to your YaaS service ②.
- Add a YaaS client to your YaaS service, and add the three new scopes to the Required Scopes list. These scopes are then available to any access token you request using this YaaS client's credentials.
- Click Deploy, so that your YaaS package is deployed, and its services are available via the API Proxy
- In your web service, search for "NEEDS_ADJUSTING" and modify the respective lines to match your YaaS project settings.
- Try running the tests now, using . If the tests pass, your web service is successfully calling the Document service.
- Debug the tests to find how your web service acquires access tokens and then uses those tokens to call the Document service.
- Repackage your web service: .
- Redeploy: .
- Open your YaaS client and add your YaaS service's proxy address ② to the Redirect URIs list.
- Hit your website at . You should see that the front-end works as before but now uses the Document service for its persistence.
YaaS Bite: Use the PubSub service ~ 1h
Objectives
- Understand what the PubSub service is and how to use it.
- Explore and understand a test that illustrates the key PubSub use cases.
Background
The PubSub service enables services on the YaaS platform to integrate using asynchronous message-based communication. This bite includes a Java-based client and a test that demonstrates and tests the following PubSub use case:- Create a PubSub topic.
- Post a message to the PubSub topic.
- Read a message from the PubSub topic, then commit that message.
- Repeat steps 2 and 3 as required.
- Close the PubSub topic.
Set up your YaaS Client
The API Proxy blocks any unauthorized calls to the PubSub service. The YaaS Bites First Steps describes how to adjust your YaaS Project to make authorized calls to the Product service. Follow a similar approach to call the PubSub service:- Subscribe your YaaS Project to the Events package that includes the PubSub service.
- In your YaaS Project, note the YaaS Client's Identifier ①, Client ID ②, and Client Secret ③.
Step through the code using the PubSub test
- Navigate to the
(yb)/essentials/yaasbitepubsubfolder. - Search for any "NEEDS_ADJUSTING" text, and adjust these values to match the YaaS Client you set up:
- Set the yaaSClientsIdentifier to your YaaS Client's Identifier ①
- Set the yaaSClientsClient_ID to your Client ID ②
- Set the yaaSClientsClient_Secret to your Client Secret ③
- Provide a name for the Pubsub topic the test creates.
- Verify that the test SanityTest.java succeeds. If not, ensure that you have followed the preceding steps correctly.
- Debug through the test and the logic it calls in PubSubClient.java.
- Examine and learn how the following actions are performed for later use:
- How the getOAuthToken method calls the OAuth2 service and returns an access token.
- How the Builder pattern is used to create the calls to the PubSub service
YaaS Bite: Use Hystrix for resilience ~ 1h
Objective
Understand how Hystrix can help you ensure your web services remain responsive even when they or their dependent services block.Background
It is critical that web services remain responsive. If your own web service, or any web service you depend on degrades or blocks, the user experience should degrade gracefully — perhaps offering less functionality, but staying responsive. A non-responsive UI, one that returns a404 or similar error is bad news. Use Hystrix to help ensure your web service remains responsive. There are many excellent tutorials on Hystrix, including Spring and JavaGeeks.In this bite, you can see Hystrix in action, protecting a simple web service. The web service has two methods of interest:
riskyMethod and veryRiskyMethod. These sample methods represent functions that could take unacceptably long to perform. Perhaps they call another web service that hangs, or they hit an overloaded database. In these steps, you simulate a performance problem in the web service, and compare how a method wrapped with Hystrix stays responsive, while a similar method, not wrapped with Hystrix, becomes unacceptably slow. You can then study the code to see how simple the solution is.Simulate performance issues with and without Hystrix
- Deploy the risky web service:
- For this bite, navigate to the
(yb)/essentials/yaasbite900folder. - Adjust the name attribute in the manifest.yml to be unique.
- Compile and package into a WAR file: .
- Push to the cloud: .
- Verify that the deployment was successful and that your web service is running: .
- Take note of the URL ① where the web service is running, which looks like:
https://yourAppName.cfapps.us10.hana.ondemand.com. - Compare the responsiveness of methods that are protected and unprotected by Hystrix:
- In a Chrome browser, access the website URL ①.
- Activate the "problem" by clicking the "problem" link on that website, then compare the time taken to call a "risky" method that is protected with Hystrix, with the time taken to call an unprotected method.
- Explore the code that enables Hystrix support in Java:
- Include a Hystrix dependency in the pom file.
- Supply a fallback method for
riskyMethod, using the @HystrixCommand annotation, which tells Hystrix to trigger the fallback method if the original method takes longer than two seconds. - Activate Hystrix with the @EnableCircuitBreaker annotation.
With carefully-placed and carefully-designed fallback methods, you can ensure that your web service degrades gracefully when overloaded or when dependencies are unavailable.
YaaS Bite: Extend the storefront ~ 2h
Objectives
Understand what the YaaS Storefront is, and how to customize and extend its functionality.Background
A YaaS storefront is a customizable, feature-rich, e-commerce web interface, supported by a backing YaaS project designed to give consumers a smooth online shopping experience. The storefront is based on Node.js, Angular, and Restangular. If you are unfamiliar with these technologies, see these excellent tutorials: Node, Angular, and Restangular.For more info, see the comprehensive Storefront tutorial in the Dev Portal.
Download and run the default storefront
- Download Node.js from Nodejs.org.
- Verify that you can run the command .
- Clone the storefront code to some folder ① and
cdinto it. - Node.js contains a package manager,
npm, for downloading dependent packages (a bit like mvn for Java). Run in the folder ① to download all the packages the storefront depends on. The storefront'spackage.jsonfile specifies the package dependencies. - Run to start a local web server.
- Open the default storefront at .
- Verify that you can see and browse the default set of products in the default storefront.
Bayern Yodelling |
Extend the storefront's functionality
The architecture of the storefront is built around Angular modules, with each module typically covering a business unit of functionality, such as products, customers, or product reviews. You can view the Angular modules that come with the default storefront at/public/js/app. To extend the storefront's functionality, you can add your own Angular modules. In this bite, you extend the storefront to include a button on the product details page. The button gives helpful tips to undecided shoppers, such as "This would add to your overall coolness," and "One word: No." You do this first with a hard-wired Proof of Concept (PoC), and then replace that PoC with a real-world implementation.Proof of Concept: Deliver tips to the undecided shopper
- For this bite, navigate to the
(yb)/storefront/yaasbitestorefrontdeltasfolder. Three folders within the directory, "one", "two", and "three", contain the changed code to copy in to the default storefront ①. - Copy the two folders from the directory
yaasbitestorefrontdeltas/oneinto their respective locations in the folder ①, overwriting the originals. - Compile your changes using the JavaScript builder tool
Grunt. If you don't yet have that, you can can download Grunt using the command: . - In folder ①, compile the changes with the command: .
- Restart your local server .
- Open the storefront at and browse to a product.
- Find and click the new What do you think, Mr Tip? button to see the new functionality.
- Search for "ADJUSTED_AS_NEEDED", to see how the extra logic was applied. You can see that this is currently a hard-wired PoC.
Bayerisch Tanzmusik |
Real-world implementation: Deliver tips to the undecided shopper
- Create a web service that stores and delivers tips to undecided shoppers:
- Navigate to the
(yb)/essentials/yaasbite200folder. This directory contains both a web service and accompanying front-end client. - Compile and package into a WAR file: .
- Execute locally: .
- Access the front-end client at .
- Add some tips, such as, "OMG YES!!!", "One word: No!", and "For your Granny, perhaps?".
- Navigate to the
- Copy the files from the
yaasbitestorefrontdeltas/twofolder into their respective locations in folder ①, overwriting the originals. - Search for "NEEDS_ADJUSTING" to find the baseUrl that you need to change to point to your web service using the line:
baseUrl: 'http://localhost:8080'. - In folder ①, compile the changes: .
- Restart your local server .
- In a Chrome browser window, open the storefront at and browse to a product.
- Find and click the new button What do you think, Mr Tip? to see the new functionality. The "Mr Tip" button should now be getting its tips from your own locally-running web service.
- In Chrome, click View > Developer > Developer Tools.
- Observe the REST communication that happens between your storefront on the front-end client (web page) and your web service.
- Search for "ADJUSTED_AS_NEEDED" to see how this extra logic is applied.
Create your own YaaS project to back your storefront
By default, the storefront is already wired to the project defaultProj, created by the YaaS storefront team. The storefront is also pre-populated with products and web services that you can browse. In this section, you create your own YaaS project to use in place of the default one, giving you complete control over the behavior, contents and appearance of your storefront.- Create a new project.
- Subscribe the project to all of the YaaS packages the Storefront needs: Cart, Checkout, Coupon Management, Customer Accounts, Order Management, Product Content, Site Management
- Create a new YaaS client and select all possible required scopes that are listed.
- Populate your storefront with some contents:
- Add some products.
- Define some images.
- Take note of the YaaS project identifier and the YaaS client ID. Enter these values in the PROJECT_ID and Client ID parameters in the file ①
/three/gruntfile.js. - Copy the file ①
/three/gruntfile.jsinto your storefront folder to overwrite the existing one. - Rebuild: .
- Run your storefront: . Now the storefront can talk to your own YaaS project.
- Visit your storefront and confirm that you can see the products and images you created in your YaaS project, rather than those from the default Storefront project.
- For further practice, you can try updating the Tips web service to call the API Proxy instead of directly calling your deployed solution.
YaaS Bite: Use the YaaS Service SDK ~ 8h
Objectives
Understand what the YaaS Service SDK is and how you can use it to build web services.Background
Until now, each YaaS bite featured web services based on Spring Boot. This bite introduces a web service built with the YaaS Service SDK. A widely adopted design pattern in web service development is "API First." The YaaS Service SDK strictly follows this philosophy. With API First, the main input or "source of truth" is the web service's API as defined in a api.raml file. The YaaS Service SDK takes this API and creates a skeletal Java/Jersey-based web service complete with:- A skeletal endpoint matching the API, to which you can add your specific business logic
- DTOs to support data transfer of JSON and Java objects
- A skeletal test framework also matching the API, to which you can add your tests logic
- More goodies, described in the YaaS Service SDK documentation
Create a web service
- Run the YaaS Service SDK's Maven archetype to generate a skeletal web service into some folder ①:
- Rather than providing a completely empty template, this mvn archetype creates, an API and supporting classes for a skeletal "wishlist web service," which is the foundation for the Wishlist tutorial, available in the Dev Portal, that you can use to practice working with YaaS.
- Explore the code the maven archetype generates. You can view:
- A Wishlist API with accompanying JSON schema and examples at
①/src/main/webapp/meta-data/api.raml - An endpoint at
①/src/main/java/com/hybris/bites/api/generated/DefaultWishlistsResource.java - A skeletal test at
①/src/test/java/com/hybris/bites/api/generated/DefaultWishlistsResourceTest.java. - This bite requires a tip service rather than a wishlist service, so you need to replace the API and logic that relates to Wishlists, with an API and logic for Tips. This has been done in the code for this bite at
(yb)/yaassdk/yaasbite1000 - Navigate to
(yb)/yaassdk/yaasbite1000. - Prepare this Maven project for Eclipse with the command . Then in Eclipse, select File > Import > Maven > Existing Maven Project to import this as a Maven project.
- Explore the code, in particular:
- the API in api.raml
- the endpoint in DefaultTipsResource.java
- the tests in DefaultTipsResourceTest.java
- Adjust the name attribute in the manifest.yml to be unique.
- Verify that you can run .
- Debug the code through
DefaultTipsResourceTest::testSanityPath(). The logic is very similar to earlier bites, but this time you are using JAX-based annotation and a web service built by the web service SDK. - Push to the cloud:
- Check that the deployment was successful using the following command: .
- Take note of the URL ② where the web service was deployed to, which looks like:
https://yourAppName.cfapps.us10.hana.ondemand.com.
Steps to create a front-end
In this bite, the WAR file does not include a front-end, so you need to deploy one separately.- Navigate to the folder for this front-end at
(yb)/yaassdk/YaaSbite1000FrontEnd. - Prepare this Maven project for Eclipse with the command . Then in Eclipse, select File > Import > Maven > Existing Maven Project to import this as a Maven project.
- Search for "NEEDS_ADJUSTING" and
- Adjust the name in the manifest.yml file to be unique.
- Adjust the URL in index.html to point to your deployed web service ②.
- Push to the cloud: .
- Check that the deployment was successful using the following command: .
- Take note of the URL ③ where the front-end is running, which looks like
https://yourAppName.cfapps.us10.hana.ondemand.com. - In a Chrome browser, open the front-end and verify that you can call the web service ③ you created.
The web service SDK in more detail
To learn more, go to the Wishlist tutorial.On Github @ https://github.com/SAP/yaas-getting-started-yaasbites
If you find any information that is unclear or incorrect, please let us know so that we can improve the Dev Portal content.
Use our private help channel. Receive updates over email and contact our specialists directly.
If you need more information about this topic, visit hybris Experts to post your own question and interact with our community and experts.