
Create a Service
Introduction
In this guide, you learn how to create, adjust, and run a simple REST service using the YaaS Service SDK. The SDK implements Java-based services and makes use of RAML, Maven, Spring, Jersey, and other popular technologies. The resulting service can run locally, or it can be deployed to a cloud environment.
Although this guide uses a Java example, other programming languages or Java technologies are supported. Once you have a REST web service that is deployable on the web, continue to the last step of this guide.
Scope of this guide
This guide explains how to define your service's API using RAML, which generates the boilerplate REST service code with stubs for your application logic. The service can be extended to interact with other services in YaaS. However, that is out of the scope for this guide, as is implementation of the application logic itself or design of a data storage layer.
The example Wishlist service
The example service created in this guide is a Wishlist service, as featured in many online shops. Its function is to itemize the products a customer wants but is not going to purchase yet. Such products are put on the customer's wishlist, which can be used for gift-giving when shared with other users, or as a reminder to the consumer to purchase the product later.
The Wishlist service initially has two REST resources:
- /wishlists — For getting a list of all the wishlists in the service.
- /wishlists/{wishlistId} — For getting one particular wishlist and its products.
In the guide, you learn how to add and modify existing resources.
Create a New Service
The YaaS Service SDK provides a Maven archetype that easily generates a development project for your new REST service. The new service is based on JEE, Spring, and the Jersey framework, which is the reference implementation of the JAX-RS standard.
Generate the project
The following steps generate a new development project for the Wishlist service example. You can choose any name for the new project, but using the suggested names makes it easier to follow the rest of this guide.
- In a terminal window, make or choose a directory to work in, and then set your working directory to there. The following steps create a separate sub-directory for the new service.
- Run the following Maven command to create an initial project directory for the new service:
mvn archetype:generate -U -DarchetypeGroupId="com.sap.cloud.yaas.service-sdk" -DarchetypeArtifactId=service-sdk-jersey-spring-archetype -DarchetypeVersion=RELEASE - When prompted, enter a groupId and an artifactId for the new project, such as the following:
Define value for property 'groupId': : com.sample.wishlist Define value for property 'artifactId': : wishlist - When prompted for further input, press Enter to accept the defaults:
Define value for property 'version':  1.0-SNAPSHOT
Define value for property 'package':  com.sample.wishlist
The following line in the final output:[INFO] Using property: asyncApi = falsespecifies that the generated service processes the requests synchronously, which is the default. To generate a service that processes the requests asynchronously, decline the default settings and specifyasyncApi = trueinstead. Alternatively, invoke the archetype generation by adding the-DasyncApi=trueoption to the Maven call. - Verify the summary of the input, and then press Enter to accept the input.
When the Maven execution completes, a confirmation message displays in the output:
[INFO] ------------------------------------------------------------------------
[INFO] BUILD SUCCESS
[INFO] ------------------------------------------------------------------------
The Maven tool creates a project directory named wishlist for your new service. It also generates a structure of sub-directories and adds the initial configuration and code to them.
Now change to the project directory:
cd wishlist
Generate service code
In the source code, you can see the file src/main/webapp/meta-data/api.raml. It contains a sample definition of the Wishlist service REST API. The next section explains more about RAML. To generate the boilerplate Jersey code for the endpoints defined there, run the following:
mvn servicegenerator:generate-service
After performing this step, the folder src/main/java contains the generated resource interfaces as well as the DTOs. They belong to the com.sample.wishlist.api package and its subpackages. You do not have to change most of those files. The business logic goes inside the resource implementation classes located in the com.sample.wishlist.api.impl package. In this case, it is the DefaultWishlistsResource.
Build and run the service
The newly generated project directory contains an example API definition for the Wishlist service. After you have generated the skeleton code, you can build and run the Wishlist service. The API service contains two endpoints, which serve as the basis for generating Jersey resources for the Wishlist service. To see what the newly generated code does, follow these steps:
- To build the project, including compiling all sources, processing resources, and bundling the project, use the following Maven command:
mvn clean install - The project is preconfigured for execution in an embedded Jetty Servlet container. To run the new service, run the following command:
mvn jetty:run To access the new service through a web browser, enter the service's default URL: http://localhost:8080.
You are redirected to the built-in API Console of the service, which you can use to explore the service API. It is easy to send your own requests to the service right from your web browser.
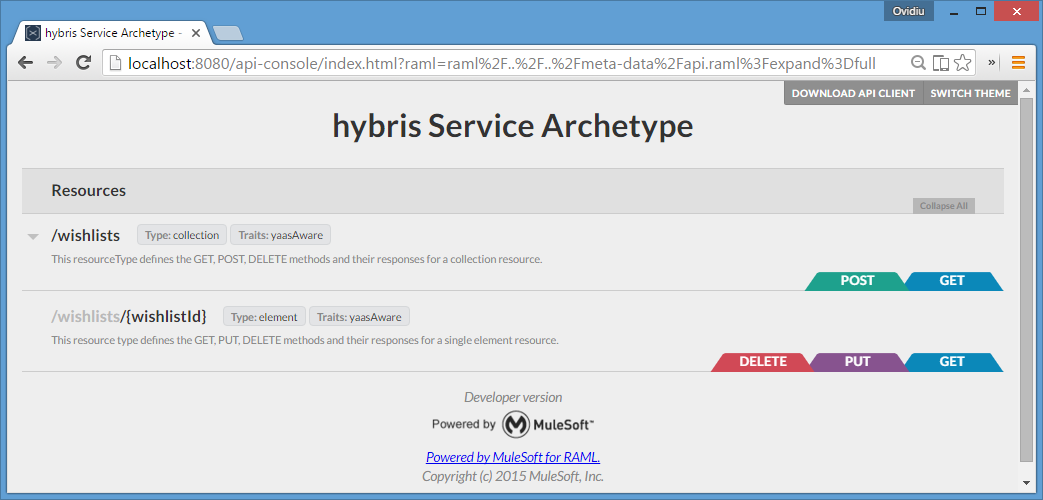
Congratulations, you just wrote and ran your first service in only a few minutes! Read on to find out on how you can examine the initial code of your new service, and also how to extend and modify your service's API.
View the Generated Code
The YaaS Service SDK makes use of RAML to define and document APIs. You can add or modify resources and methods simply by modifying the RAML file. Read the RAML 6-Step Tutorial in order to familiarize yourself with the concept of RAML API modeling before continuing to the next section.
RAML offers several alternatives for defining data types. This guide focuses on the JSON Schema, which is a great choice for lightweight service APIs. The above RAML tutorial contains an example of a JSON Schema in RAML, as does this guide.
RAML resource definition
By default, the API definition of your service is in the RAML file src/main/webapp/meta-data/api.raml.
You can modify this file to modify or manipulate the API of your service. Initially, it contains a starting point for the API of the Wishlist service, which is extended later on in this guide:
src/main/webapp/meta-data/api.raml:
#%RAML 0.8
title: hybris Sample Service - API for Wishlists
baseUri: http://localhost/
version: v1
mediaType:  application/json

schemas:
  - wishlists: !include schemas/wishlists.json
  - wishlist: !include schemas/wishlist.json
  - wishlistItem: !include schemas/wishlistItem.json
  - error: !include https://pattern.yaas.io/v1/schema-error-message.json

traits:
  - !include https://pattern.yaas.io/v2/trait-yaas-aware.yaml

resourceTypes:
  - !include https://pattern.yaas.io/v2/resource-type-element.yaml
  - !include https://pattern.yaas.io/v1/resource-type-collection.yaml

/wishlists:
  type: collection
  is: [yaasAware]
  get:
    description: Gets all wishlists
    responses:
      200:
        body:
          application/json:
            example: !include examples/wishlists-example.json
  post:
    description: Creates a new wishlist
    body:
      application/json:
        example: !include examples/wishlist-example.json

  /{wishlistId}:
    type: element
    is: [yaasAware]
    uriParameters:
      wishlistId:
        description: the id of the wishlist to work on
        example: 784hti8ey
        type: string
    get:
      description: Gets a wishlist
      responses:
        200:
          body:
            application/json:
              example: !include examples/wishlist-example.json

    put:
      description: Updates a wishlist
      body:
        application/json:
          example: !include examples/wishlist-example.json

    delete:
      description: Deletes a wishlist
This RAML file defines a /wishlists resource, which accepts GET and POST requests for retrieving the collection of all wishlists and adding new wishlists. It also defines the /wishlists/{wishlistId} resource, which defines GET, PUT, and DELETE methods that manipulate a single wishlist.
You may have noticed the references to the *.json and *.yaml files in the above RAML file. These files include JSON Schemas, resource types, and traits from the RAML Pattern library. The RAML patterns are part of the SDK, and they serve the purpose of externalizing common parts of the RAML definition. This makes your RAML files shorter and more readable.
JSON Schema data type definitions
The following example JSON Schema defines a single wishlist and is a project-specific include.
src/main/webapp/meta-data/schemas/wishlist.json:
{
  "$schema": "http://json-schema.org/draft-04/schema#",
  "title":"Wishlist",
  "type":"object",
  "properties":
  {
    "id":
    {
      "type":"string"
    },
    "url":
    {
      "type":"string",
      "format":"uri"
    },
    "owner":
    {
      "type":"string",
      "pattern":"^.+"
    },
    "title":
    {
      "type":"string",
      "pattern":"^.+"
    },
    "description":
    {
      "type":"string"
    },
    "createdAt":
    {
      "type":"string",
      "format":"date-time"
    },
    "items":
    {
      "type":"array",
      "items":
      {
        "$ref":"wishlistItem"
      }
    }
  },
  "required":["id","owner","title"]
}
A wishlist has an ID and an owner, as well as list of wishlistItems. The following is a definition of a wishlist item:
src/main/webapp/meta-data/wishlistItem.json:
{
  "$schema": "http://json-schema.org/draft-04/schema#",
  "title": "Wishlist Item",
  "type" : "object",
  "properties":
  {
    "product":
    {
      "type":"string",
      "pattern":"^.+"
    },
    "amount":
    {
      "type":"integer",
      "minimum":1,
      "default":1
    },
    "note":
    {
      "type":"string"
    },
    "createdAt":
    {
      "type":"string",
      "format":"date-time"
    }
  },
  "required":["product", "amount"]
}
A wishlist item is a reference to the desired product. It also contains the meta information, such as the desired product quantity or the date the product was added to the wishlist.
Overview of the generated Java code
In the project directory, open the src/main/java folder and view the com.sample.wishlist package. The JerseyApplication class contains the configuration of the Jersey Servlet. The following line registers all of the Jersey resources and providers that exist in the same package as JerseyApplication or its subpackages, so it takes care of registering the newly-generated Jersey resources:
packages(getClass().getPackage().toString());
Other lines register various Jersey features that help with consistent logging, JSON marshalling and unmarshalling and Basic Authorization.
Resource-implementation stubs
The package com.sample.wishlist.api contains files generated from the RAML API definition. The DefaultWishlistResource class inside the com.sample.wishlist.api.impl package is the only available resource implementation, because it is the only resource currently defined. The methods of this class are merely stubs. Add your implementation and connect directly to the data persistence layer, or introduce a service layer. You can decide how to implement the service. Afterward, the API is exposed to the world, as defined by the RAML.
Open the src/test/java folder to locate DefaultWishlistResourceTest , a generated JUnit test class, inside the com.sample.wishlist.api.impl package. Similar to the class above, this class contains dummy tests only. They are filled in and extended during the implementation of the service.
Resource interfaces and DTOs
The parent interface of the DefaultWishlistResource also resides in the com.sample.wishlist.api.impl package, in the src/main/java folder. This directory contains numerous other files, which consist mainly of resource interfaces and Data Transfer Objects (DTOs).
The WishlistResource interface has all the annotations that are necessary for the Jersey REST framework and the Bean Validation framework. These annotations are inherited by the implementing resource class. They are never copied into the resource class itself.
Add a New Resource
A wishlist service is not functional without the ability to add or view the products in the wishlist. This section describes how to add a resource representing a list of wishlist items to the Wishlist service.
/wishlists/{wishlistId}/wishlistItems
Add the new resource in RAML
The Service SDK provides an API Generator that makes it easy to implement application logic for the service's API definitions. Once the RAML definition is modified, the necessary classes and code snippets are generated. The new resource represents the list of wishlistItems that are saved on a wishlist. For example, add the following lines at the bottom of the RAML definition:
src/main/webapp/meta-data/api.raml:
    /wishlistItems:
      type: collection
      is: [yaasAware]
      get:
        description: Gets all wishlist items
        responses:
          200:
            body:
              application/json:
      post:
        description: Adds a wishlist item
        responses:
          201:
            body:
              application/json:
When you add the /wishlistItems sub-resource to the /wishlists/{wishlistId} resource, you can also define the GET and POST methods with responses 200 and 201. These responses are explained in the RAML specification.
In the example above, the type: collection refers to the collection resource-type, as defined in the YaaS RAML Patterns. Adding this type to a resource adds default definitions of the HTTP methods. They are usually applied to a collection REST resource, such as getting a list of items, and posting one single item. This resource also automatically searches for JSON Schemas that have a name matching the resource name. With the GET method, it is the singularized resource name, and with a name such as wishlistItem, the resource applies the schema on the POST method. There is already a wishlistItem.json file defined, but not a wishlistItems.json file.
Define the corresponding JSON Schema type
The new JSON Schema is very similar to the existing wishlists.json file. Create a new file in the src/main/webapp/meta-data/schemas directory and name it wishlistItems.json. Paste the following content inside:
src/main/webapp/meta-data/schemas/wishlistItems.json:
{
  "$schema": "http://json-schema.org/draft-04/schema#",
  "title":"Collection of Wishlist items",
  "type":"array",
  "items":
  {
    "$ref":"wishlistItem"
  }
}
Include the new JSON file in your RAML file definition. Open the api.raml file and input the following line, along with the other !includes, below the schemas keyword:
src/main/webapp/meta-data/api.raml:
- wishlistItems: !include schemas/wishlistItems.json
Adjust the Java code
After you finish extending the RAML API definition, go to the project directory and run mvn servicegenerator:generate-service -Dservice-generator.output.types=DTO,RESOURCE -Dservice-generator.output.overwrite=true to trigger the generation of new resource interfaces and DTOs. If you try to build the project mvn clean install, it fails to build due to compilation errors, displaying the following error messages:
[ERROR] \Projects\wishlist\src\main\java\com\sample\wishlist\api\impl\DefaultWishlistsResource.java:[14,8] com.sample.wishlist.api.impl.DefaultWishlistsResource is not abstract and does not override abstract method postByWishlistIdWishlistItems(com.sample.wishlist.api.param.YaasAwareParameters,java.lang.String,com.sample.wishlist.api.dto.WishlistItem) in com.sample.wishlist.api.WishlistsResource
Address is already in use, make sure you have stopped the local Jetty instance. If you get other errors during compilation, ensure that your RAML file does not have extra spaces or tabs in it.The errors above are expected. To resolve them, investigate the code by opening your IDE. Refresh your project to pick up new versions of the generated files, and view the content of the DefaultWishlistsResource class. Notice that the interface is extended by the two methods that you just defined in the RAML file, but the implementation class is not updated accordingly. This is what is causing the errors.
This behavior is expected. You have not instructed the API Generator to replace the implementation classes, such as the DefaultWishlistsResource. The same goes for the corresponding jUnit test class, such as DefaultWishlistResourceTest. You would typically not want to overwrite them as they contain your business and testing logic. If the API definition of a service ever changes, you must do one of the following:
- Option A: Manually adjust the resource implementation to match the changed Java interface that it implements.
- Option B: Force the regeneration of all the files, by executing the
generate-servicegoal without the output types specified:mvn servicegenerator:generate-service -Dservice-generator.output.overwrite=true.
To fix the compilation errors in the example, let us follow Option A, and add the following two methods:
src/main/java/com/sample/wishlist/api/impl/DefaultWishlistsResource.java:
public Response getByWishlistIdWishlistItems(
          YaasAwareParameters yaasAware,
     String wishlistId) {
            return Response.ok()
                .entity(new java.util.ArrayList<>()).build();
}

public Response postByWishlistIdWishlistItems(
          YaasAwareParameters yaasAware,
      String wishlistId,
     WishlistItem wishlistItem) {
            return Response.created(uriInfo.getAbsolutePath())
                .build();
}
Remember to extend the tests, and add new test cases. Ideally, you also provide an implementation to these tests, and the remaining tests:
src/test/java/com/sample/wishlist/api/impl/DefaultWishlistResourceTest.java:
@Test
public void testGetByWishlistIdWishlistItems()
{
    final WebTarget target = getRootTarget(ROOT_RESOURCE_PATH).path("/wishlistId/wishlistItems");
    final Response response = target.request().get();
    Assert.assertNotNull("Response must not be null", response);
    Assert.assertEquals("Response does not have expected response code", Status.OK.getStatusCode(), response.getStatus());
}

@Test
public void testPostByWishlistIdWishlistItemsWithWishlistItem()
{
    final WebTarget target = getRootTarget(ROOT_RESOURCE_PATH).path("/wishlistId/wishlistItems");
    final com.sample.wishlist.api.dto.WishlistItem entityBody =
    new com.sample.wishlist.api.dto.WishlistItem();
    final javax.ws.rs.client.Entity<com.sample.wishlist.api.dto.WishlistItem> entity =
    javax.ws.rs.client.Entity.entity(entityBody,"application/json");
    final Response response = target.request().post(entity);
    Assert.assertNotNull("Response must not be null", response);
    Assert.assertEquals("Response does not have expected response code", Status.CREATED.getStatusCode(), response.getStatus());
}
Now, build your project again. You can also start up the service with the mvn jetty:run command and check that the new resource is visible. You have now finished adding a new REST resource to the API.
Modify Existing Resources
As mentioned earlier, the YaaS Service SDK provides reusable RAML Patterns. This section of the guide describes how to enhance the Wishlist service to make even better use of these patterns.
The paged trait is designed to be used with collections that have many elements. With such collections, it is reasonable to browse them page by page, rather than requesting all of them at once. This trait adds two query parameters to the HTTP method, which specifies the desired page size and page number, as well as response headers which contain the links to the current, previous, and next items.
Modify the RAML definitions
To add paging capability for the collection resources using the paged trait, open the RAML definition and add an !include for the paged trait:
src/main/webapp/meta-data/api.raml:
traits:
  - !include https://pattern.yaas.io/v2/trait-paged.yaml
Next, mark the collection type GET methods to be paged. Add is: [paged] to both wishlists and wishlistItems, as shown in these code snippets:
src/main/webapp/meta-data/api.raml:
/wishlists:
  type: collection
  is: [yaasAware]
  get:
    description: Gets all wishlists
    is : [paged]
    responses:
    /wishlistItems:
      type: collection
      is: [yaasAware]
      get:
        description: Gets all wishlist items
        is : [paged]
        responses:
Trigger the regeneration of the service code by running mvn servicegenerator:generate-service -Dservice-generator.output.types=DTO,RESOURCE -Dservice-generator.output.overwrite=true.
Adjust the Java code
If you try to rebuild the project by running mvn clean install at this point, the build fails with the following error messages:
[ERROR] \Projects\wishlist\src\main\java\com\sample\wishlist\api\impl\DefaultWishlistsResource.java:[18,8] com.sample.wishlist.api.impl.DefaultWishlistsResource is not abstract and does not override abstract method getByWishlistId(com.sample.wishlist.api.param.PagedParameters,com.sample.wishlist.api.param.YaasAwareParameters,java.lang.String) in com.sample.wishlist.api.WishlistsResource
[ERROR] \Projects\wishlist\src\main\java\com\sample\wishlist\api\impl\DefaultWishlistsResource.java:[24,9] method does not override or implement a method from a supertype
Look at the code again, but first, refresh the project in your IDE so that the newly generated files are included. Then, go to the DefaultWishlistResource class, and compare it with its interface, WishlistsResource. The GET methods for the collection resources in the interface have an additional parameter:
..., @javax.ws.rs.BeanParam @javax.validation.Valid final com.sample.wishlist.api.param.PagedParameters paged);
Examine the PagedParameters class. It has been generated based on the paged trait, and it contains getters and setters for pageSize and pageNumber. Adjust the methods in the implementing class to also include the paged parameter. That fixes the compilation errors in the DefaultWishlistResource class.
Inside the implementations of the updated GET methods, use the paged parameter to get the values of the pageSize and pageNumber query parameters that are supplied by the user. You can use these values later to limit the number of items returned by doing an appropriate query to the database. This is, however, out of scope of this guide.
Build the project again using the mvn clean install command. Run the service mvn jetty:run and then look at the API Console, which displays the two new query parameters for pageSize and pageNumber. You enhanced your API by adding paging capability.
Register a Service in the Builder
After you create and try out your service locally, deploy it to a cloud environment where it is accessible for the YaaS API proxy. You can deploy your service any way you want, or check out the Deployment documentation for some options.
Register your service
After you deploy the service, sign in to the Builder and register the service so that it is visible for the API Proxy. While logged in to the Builder, the name of your currently selected organization is in the upper left corner. If you have not been invited to an organization yet, you can create a new one. First, set the YaaS URL for your new organization before creating your first service. This YaaS URL is a base path that becomes part of all of the URLs for your service.
In order to register a service you need to be a member of a Project. If you don't have a project yet, select the + Project button on the Builder main page. Complete the details, and then Save.
To register your service, click on Services from your project's menu, and then add a new service by clicking + Service button. Complete the mandatory details including Identifier, Description, Version, and the Source URL. The Source URL is the URL of your deployed service, such as http://yourservicehost.internal.yaas.io. After completing all the data click Save.
If you plan to call other YaaS services from your service, you need to attach a client to your service, to allow it to consume other YaaS APIs. Click the + Client button and then select New Client from the drop-down menu. Select the scopes that are relevant to the backing services that your service consumes. You have access only to the YaaS Essential scopes if your project is not subscribed to a package. Select Next and complete the required values, such as Identifier and Display name. The authorization data of the client are now linked with your service.
Now your service has received a generated URL accessible in the YaaS API Proxy.
Secure your service
After registering your service so that it is accessible for the YaaS API Proxy, it could be accessible by any request that calls your service directly, which bypasses the proxy. To prevent this, go to your service's Details page and use the Basic Authentication mechanism to secure your service. Generate a username and password and these values are used for any service generated from the YaaS archetype, using the BASIC_AUTHENTICATION_CREDENTIALS environment variable. Afterwards, only the YaaS API proxy can call your service directly, using the credentials from the Basic Authentication.
Publish your service
The details of the service have been created, but the service's API is not accessible through the generated public URL until you click on the Deploy button, which enables the proxy URL. Afterwards, your service is up and running, and its API is accessible publicly. Who can access the endpoints of your service is controlled by the YaaS API Proxy.
In YaaS, a set of functionally-related services is bundled together as a package. Others can subscribe to these packages to use those services. To make your service accessible for others, wrap your service in a package. Click on your team name, click Packages, and then click on + NEW PACKAGE. Select your service to include in the package, and complete the other details. You do not have to publish your package yet if you are in the testing phase. It is also possible to leave your package as private and let others subscribe to it by providing them with the Identifier of your package. You can test this scenario yourself by following the steps in the following section.
Test multi-tenant scenarios for your service
To test that others can subscribe to your package, follow these steps:
- Create another project, for example, mytest123.
- Navigate back to your package, and select the whitelist option for the mytest123 project in the Access Control section.
- Copy the Version ID of your package. Navigate to the mytest123 project, and add a private subscription in the Subscriptions option in the project's Administration menu. Then paste the ID.
Now you can test it as any other package available in the YaaS market. For example, add service scopes to your client in the mytest123 project and request access tokens with these scopes, or allow your service to perform operations in the name of the mytest123.
If you find any information that is unclear or incorrect, please let us know so that we can improve the Dev Portal content.
Use our private help channel. Receive updates over email and contact our specialists directly.
If you need more information about this topic, visit hybris Experts to post your own question and interact with our community and experts.