
Create a Builder Module
Introduction
In this guide, you'll create a Builder module to easily manage the Wishlist service data from a user interface. By the end of these steps, you will have a module to create new and view existing wish lists belonging to a test customer.
Prerequisites
Before going through this tutorial:
- Make sure that you've set up your environment as detailed in the guide 'Set Up the Environment'.
- Create the Wishlist service found in the guide 'Create a Service'.
- Set Up a Project, Create a Client and create a test Customer as described on this page . Make a note of the customer id.
- Download and customize the source code of the service as described on this page. Customize the manifest.yml file by entering your client data.
- Build an artifact file and deploy it.
- Register the wishlist service in your project. Use the URL of the deployed service as the source url value for the US region.
- Attach the client to your service and click DEPLOY.
- Make a note of any of the generated proxy urls for your service. You will need them while developing the builder module for the service.
Now, you're ready to create a Builder module that uses the Wishlist service to fetch and create wishlists.
Create a Builder Module
Goal: Build a simple example list of wishlists. The title and description of each wishlist will appear. This is a user interface for the /wishlists endpoint of your service API.
Follow these steps:
Open your proxy URL of the wishlist service and examine any of the methods (either POST or GET). Check the json schema.
Download the latest Builder SDK CLI version for Windows or UNIX/Linux/MacOS.You can download the ZIP file directly or follow the Brew installation guide.
In a terminal window, type
builderto see the available commands.Invoke the
builder createModule [moduleName]command to create your own Builder module. You can choose from several templates. To list the wishlists, select the list template.builder createModule wishlist-module Available templates: 0. simple - Only the bare minimum needed for a builder module. 1. demo - Contains many examples of various features. 2. list - A view displaying a list, already prepared for making calls to an API via Restangular. 3. uiExtensibilityHost - Contains a view capable of including plugin modules. 4. uiExtensibilityPlugin - Plugin module example. Enter a number > 2 This template allows you to specify replacement values for variables within the resource files. To set the values at a later time, just leave them empty. Please enter your service base url.Enter the proxy url of your wishlist service - https://api.us.yaas.io/hybris/{yourServiceId}/{version}
Here is an example:
> https://api.us.yaas.io/hybris/my-wishlist-service/v1Continue entering essentials for the list component: the resource endpoint, primary and secondary labels of the list elements.
 Please enter your service endpoint.
 > wishlists
 Please enter the name of the property to be used as the main label displayed for each list item.
 > title
 Please enter the name of the property to be used as the secondary label displayed for each list item.
 > description
 Creating file wishlist-module/index.html
 Creating file wishlist-module/controller/listCtrl.js
 Creating file wishlist-module/nginx.conf
 Creating file wishlist-module/manifest.yml
 Creating file wishlist-module/builder/module.json
This command generates the basic files for your Builder module: a module.json module descriptor, and an example HTML file with a prebuilt list component. For more information, see the Builder SDK documentation.
Enter the newly created folder. Run the Builder module with the following command:
builder runModuleOpen the module descriptor locally in your browser: https://localhost:8081/builder/module.json. Accept the self-signed certificate.
Register Your Builder Module
The Builder module described in this guide builds on the Wishlist service example that you created in the guide Create a Service.
- Log in to the Builder and select an organization.
- Navigate to Your Project > Development > Builder Modules, and create a new Builder module.
- Click Next leaving Required Scopes empty since your wishlist service does not require any scopes.
- Complete all of the fields in the section Register Builder Module. Use
https://localhost:8081/builder/module.jsonas the Module Location (URL) for the US region. The system automatically sets Redirect URI as the Builder's Authorization Callback URI, ensuring that your Builder module works correctly. - Enable the option Use this Builder for my Project.
- Click Save. The Builder module is now registered in YaaS and served from your local machine.
- Navigate to your project overview page. You can see it is visible in the navigation.
Wishlists are most likely not yet visible. After customizing the code of the module, it allows you to create wishlist data.
Development and Testing
Here is how you can customize the code of your Builder module and test it.
Open the entire generated folder in your preferred IDE.
Configure your service proxy URL as a setting entry in your /builder/module.json file.
Add this setting in the controller code using the following code sample:{ "widgets": [ { "id": "my-wishlist", "title": "Wishlist", "settings": { "viewUrl": "index.html", "wishlistServiceUrl": {your_wishlist service proxy url} } } ] }$scope.wishlistServiceUrl = Builder.currentWidget.settings.wishlistServiceUrl; Restangular.setBaseUrl($scope.wishlistServiceUrl);Add the new feature: creating new wishlists.
The list of wishlists is probably empty because there is no data served from your service. You want to allow the creation of new wishlists.
Add a button which triggers a modal window for the user to fill in new wishlist data for the customer. In actual production, you would be managing wishlists for real customers. In this example, you'll focus on one test customer in order to keep things simple.
Configure customer id as a setting in module.json
     {
         "widgets":[
             {
                 "id": "my-wishlist",
                 "title": "Wishlist",
                 "settings": {
                     "viewUrl": "index.html",
                     "wishlistServiceUrl": "https://api.us.yaas.io/hybris/my-wishlist-service/v1",
                     "customerId" : {testCustomeId} // as created while setting up wishlist service
                 }
             ]
      }
Wrap the code that reads the wishlists into a function and call it at the end of the controller:
     $scope.loadWishlists = function() {
         Restangular.one('wishlists').getList().then(function(items){
             $scope.items = items;
         },function(error){
             //handle error
         });
     };

     $scope.loadWishlists();
Add a dependency to the ui.bootstrap module in your angular module. Include the ui.bootstrap library in the index.html file.
<script src="https://builder.yaas.io/public/js/vendor/angular-bootstrap/ui-bootstrap-tpls.js"></script>Include the ui.bootstrap module in your angular module and inject the $modal provider in your controller in listCtrl.js.
  var defaultListApp = angular.module('defaultListApp', ['builder', 'builder_editors', 'ui.bootstrap']);
  defaultListApp.controller('defaultListCtrl', ['$scope','Restangular', '$modal', function($scope, Restangular, $modal){
     ...
  }
Now you are ready to add a button which will show a modal window. Add a button as a first element in the list:
  <li class="y-add dataCard ">
     <button  type="button" class="y-add-btn" ng-click="openModal()">
         <span class="hyicon hyicon-add"></span>
         Add Wishlist
     </button>
 </li>
Implement a function called openModal in listCtrl.js. This function initializes a new wishlist object and opens a modal window:
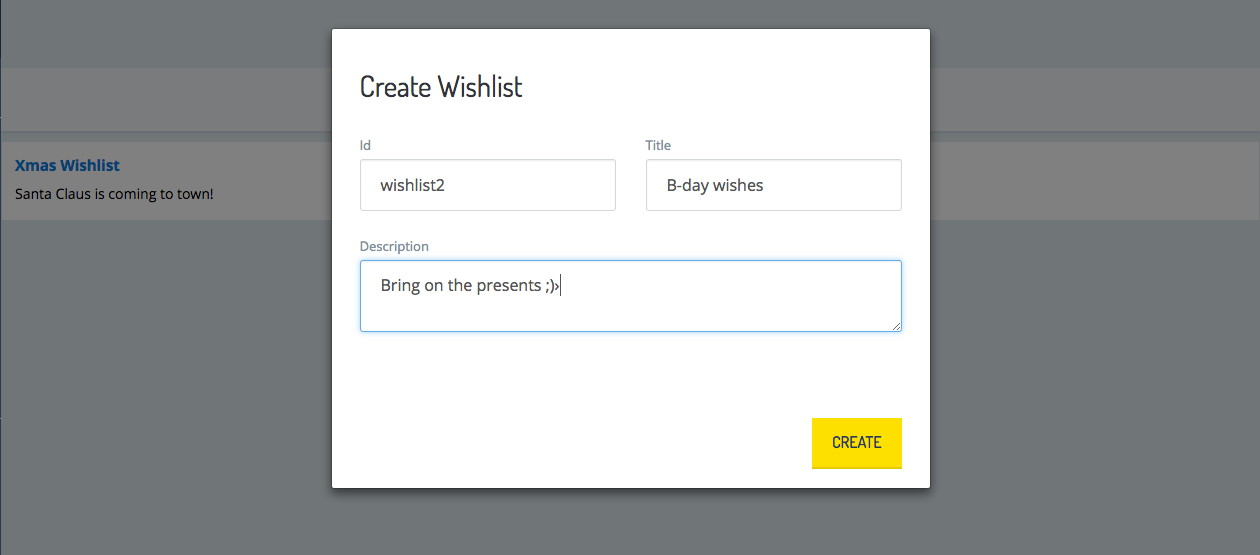
 $scope.openModal = function() {
         $scope.newWishlist = {
             id : "",
             owner : Builder.currentWidget.settings.customerId,
             title : "",
             description : ""
         }
         $scope.newWishlistModal = $modal.open({
             animation: true,
             templateUrl: 'add-wishlist-modal.html',
             scope: $scope
         });
     };
Create the file add-wishlist-modal.html in the root folder of your module. It will serve the content for the modal window.
 <div class="modal-header">
         <h1>Create Wishlist</h1>
     </div>
     <div class="modal-body">
         <div class="row">
             <div class="col-sm-6">
                 <div class="form-group">
                     <label for="id" class="control-label">Id</label>
                     <input id="id" class="form-control input-lg" ng-model="newWishlist.id" />
                 </div>
             </div>
             <div class="col-sm-6">
                 <div class="form-group">
                     <label for="title" class="control-label">Title</label>
                     <input id="title" class="form-control input-lg" ng-model="newWishlist.title" />
                 </div>
             </div>
         </div>
         <div class="row">
             <div class="col-sm-12">
                 <div class="form-group">
                     <label for="description" class="control-label">Description</label>
                     <textarea id="description" class="form-control input-lg" ng-model="newWishlist.description" />
                 </div>
             </div>
         </div>
     </div>
     <div class="modal-footer">
         <button class="btn btn-lg btn-primary" ng-click="createWishlist()">Create</button>
     </div>
Implement a createWishlist function in listCtrl.js. This function submits new wishlist data to your wishlist service:
  $scope.createWishlist = function() {
      Restangular.one('wishlists').customPOST($scope.newWishlist).then(function(){
          $scope.loadWishlists();
           $scope.newWishlistModal.close();
      },function(error){
          //handle error
      });
  };
Review the code.
index.html
 <html>
 <head lang="en">
  <meta charset="UTF-8">
     <!-- custom stylesheets -->
     <link href="https://builder.yaas.io/public/css/styles.css" rel="stylesheet" />
     <script src="https://builder.yaas.io/public/js/vendor/jquery/dist/jquery.min.js"></script>
     <script src="https://builder.yaas.io/public/js/vendor/underscore/underscore.js"></script>
     <script src="https://builder.yaas.io/public/js/vendor/angular/angular.js"></script>
     <script src="https://builder.yaas.io/public/js/vendor/restangular/dist/restangular.min.js"></script>
     <script src="https://builder.yaas.io/public/js/builder.js"></script>
     <script src="https://builder.yaas.io/public/js/builder_editors_v2.js"></script>
     <script src="https://builder.yaas.io/public/js/vendor/angular-bootstrap/ui-bootstrap-tpls.js"></script>

     <script src="./controller/listCtrl.js"></script>
     <title>The Simple One</title>
 </head>
 <body ng-app="defaultListApp">
     <div ng-controller="defaultListCtrl" class="wrapper">
         <ul class="dataCards dataCards-singleColumn">
             <li class="y-add dataCard ">
                 <button  type="button" class="y-add-btn" ng-click="openModal()">
                     <span class="hyicon hyicon-add"></span>
                     Add Wishlist
                 </button>
             </li>
             <li class="dataCard" ng-repeat="item in items">
                 <div class="cardRow cardRowClickable">
                     <p class="primaryData">
                         {{item.title}}
                     </p>
                     <p class="secondaryData">
                         {{item.description}}
                     </p>
                 </div>
             </li>
         </ul>
     </div>
 </body>
 </html>
Test
Now, preview the changes. All you need to do now is go to the Builder and navigate to your project in order to see the changes.
Deploy
Deploy your Builder module to your favourite platform. We recommend these:
- SAP Cloud Platform
- Cloud Foundry Environment
- Neo Environment
Click here to see details pertaining to deployment.
Go to Your Project -> Development -> Builder Modules -> Your Builder Module and change the Module Location (URL) from local address to the URL of the deployed module.
Now you and your project members can use it.
Getting help
This page provides you with resources to support you in your development
General resources
- Help and Support - A list of ways to get customer assistance
- SAP Hybris Techné - SAP Hybris Techné is the design guideline and component library for modern, mobile-first, user-centric experience design.
- The Hybris experts forum - If you have a YaaS account, help build the community by asking and answering technical questions.
Components
Refer to the Builder documentation for code examples and details when implementing components.
- Form elements - Form Elements include the layout of a field itself, checkboxes, radio buttons and states of a field.
- Help mode - Help mode is an optional functionality in the Builder which activates hints for specific fields of the Builder module.
- The localized editor - The localized editor is a custom Angular directive.
If you find any information that is unclear or incorrect, please let us know so that we can improve the Dev Portal content.
Use our private help channel. Receive updates over email and contact our specialists directly.
If you need more information about this topic, visit hybris Experts to post your own question and interact with our community and experts.