
Extensibility
Extending YaaS Data Structures
Due to the microservice nature of YaaS, each data item is owned by its specific service. Because you don't have direct influence on the implementation of the service, extending data items is not as simple as changing the service's source code. Instead, you can add individual fields to the data item. For example, to use the Product service and a product data item to store additional data, you can:
- Store the new data along with the actual product data item, managed in the Product service. Select this extension mechanism if the new data is a core product data item, such as a foreign ID field or the dimensions of a given product. In YaaS, there is a mixin concept used to enable those extensions. Therefore, it is important that the microservice with the extensible data supports the mixin feature.
- Store the new data item in a new service and link it to the actual product data item. Select this extension mechanism if the new data is not a core product data item, such as ratings and reviews of a specific product. If the new data serves different usage characteristics, implement a dedicated service dealing with the new data item by following the rules described in the Extending the Builder section.
To ensure that your service is compliant with the YaaS mixin concept, you should follow these rules:
- The metadata and mixins fields at level 1 in your service's API JSON request and response documents are reserved keywords and must follow the rules in the mixins documentation.
- The metadata and mixins fields must be accepted on every request and stored in your underlying data store, such as the Document Repository.
- The metadata and mixins fields must be populated on every response your service sends.
Extending the Builder
UI extensibility in the Builder is a functionality that enables developers and owners to customize the structure of separate views according to their needs. You can do this by creating widgets in module.json files inside your Builder module structure. The process consists of creating two different Builder modules:
- Extensible Builder Module: Create a template for an extensible view with a customized number and height of columns with personalized background colors by using an extensible Builder module.
- Extending Builder Module: Modify the
module.jsonfile in the extending Builder module according to the previously created template and implement it in the Builder.
Create an extensible Builder module
Create a new Builder module in your root Builder folder and follow the instructions in the Builder SDK documentation. Instead of an example code snippet from there, use the one shown below:
{
    "widgets": [{
        "id": "myExtensibleWidgetId",
        "title": "My Extensible Widget",
        "settings": {
            "viewUrl": "index.html"
        },
        "extensible" : {
            "layout" : "grid",
            "columns" : [
                "4", "4", "4"
            ],
            "height" : "dynamic",
            "background" : "#EDF1F5"
        }
    }]
}
The aforementioned code snippet consists of the extensible widget. Inside the widget, you can specify following properties:
- layout - The type of layout in the specific view. For now, you can make a grid out of your view in a Builder module.
- columns - Specify the width of separate columns as well as their number. Total width is limited to 12.
- height - Set the height as dynamic or specify the size, such as "300px".
- background - Set the background color here by adding the color name or its RGB code.
In order to implement your extensible Builder module in the Builder, follow Steps 2 and 3 from the Create a Builder Module section of the Getting Started guides.
You have now implemented the framework for the extensible Builder module. The next section describes how to make an extensible Builder module visible in the Builder.
Extend your Builder module
Create another Builder module in your root Builder folder where you can design a new extensible view in the Builder. The code snippet for the newly created module.json file is shown below:
{
    "widgets": [{
        "id": "myWidgetId",
        "title": "My Widget",
        "settings": {
            "viewUrl": "index.html"
        },
        "extends": {
            "id": "myExtensibleWidgetId"
        }
    }]
}
In order to extend and implement your Builder module in the Builder, perform the same steps as in the previous section. Your Builder module will be visible in the project navigation with the name you specified in the title field.
Extending the Storefront
You can extend the storefront application in any number of ways, depending on your requirements. You can create an entire parallel application from the bootstrap, enabling parallel services, views, routes, and controllers to exist. This is primarily due to the modular architecture and separation of concerns provided by the Angular framework. This section provides a high-level overview of each type of extensibility with detailed examples.
Extensibility
You can extend the storefront in the following ways:
- Application - You can bootstrap an entirely different application in parallel to the Demostore and then move the desired architecture and features to the new application.
- Modules - In a new folder, you can have duplicated component modules to enable feature customization.
- Services – With a new file in a new folder, you can separate new services from existing services but still call them in parallel to validate behavior.
- Controllers – By renaming controllers in the same folder or a separate folder, you can alter business logic that connects with the new services or factories to keep custom controllers thin.
- Directives – With granular architecture, you can turn behaviors on or off. HTML component behaviors are encapsulated by a directive and can be altered or removed.
- Routes – With routes for highly divergent templates, behaviors, and services, you can extend the router to add new views.
Extending the application
In the Demostore architecture, the bootstrap.js file enables you to load the application from any module:
The bootstrap loads the Demostore application through the ds.app module:
angular.element( document ).ready( function () {
    angular.bootstrap( document, ['ds.app'] );
});
Then you can clone the entire site into a new folder. In this example, it is with a module called MyApp:
Rename the app.js file to your application name, such as MyNamespace.MyApp. Then add that file to the index.html file. This enables both versions of the storefront to work in parallel throughout your application development life cycle. Reference your application module instead of the ds.app module, and your development site is loaded:
(function () {

    try {
        angular.element( document ).ready( function () {
            angular.bootstrap( document, ['MyNamespace.'] );
        });

    } catch (exception) {
        console.error('Unable to invoke angular.bootstrap:');
        console.error(exception);
    }

})();
At this level, you have the ability to load the full Demostore framework for comparison or to troubleshoot any feature at any time. Switch the bootstrap to point to the original module:
angular.element( document ).ready( function () {
    angular.bootstrap( document, ['ds.app'] );
});
Extending modules
Extending modules is similar to extending an application. It uses the same technique to extend a component or feature for customization. For example, you can customize the Cart module by cloning it into a custom cart module named cart_custom: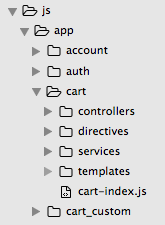
In the index.html file, update all of the references to the files in the /cart/ folder and make sure they point to the cart_custom folder.
 <script src="js/app/cart_custom/cart-index.js"></script>
 <script src="js/app/cart_custom/controllers/cart-ctrl.js"></script>
 <script src="js/app/cart_custom/controllers/cart-note-mixin-ctrl.js"></script>
 <script src="js/app/cart_custom/directives/cart-auto-toggle.js"></script>
 <script src="js/app/cart_custom/services/cart-rest.js"></script>
 <script src="js/app/cart_custom/services/cart-service.js"></script>
 <script src="js/app/cart_custom/services/cart-note-mixin-service.js"></script>
Any alterations made in the cart_custom module contain your business requirements in the checkout process. If a comparison to the original behavior is required, you can revert back to the original ds.cart module.
Extending services
You can extend specific behavior, such as changing the Cart service, without any modification to the controllers or directives. Clone the existing cart service and alter it, similar to adding a new service, with the cart-service-custom.js file:
To inject this service as a dependency, change the inclusion of that file. If they are both named CartSvc, no other alteration is required:
<script src="js/app/cart/controllers/cart-ctrl.js"></script>
<script src="js/app/cart/directives/cart-auto-toggle.js"></script>
<script src="js/app/cart/services/cart-rest.js"></script>
<!--script src="js/app/cart/services/cart-service.js"></script-->
<script src="js/app/cart/services/cart-service-custom.js"></script>
<script src="js/app/checkout/checkout-index.js"></script>
Optionally, you can rename the service to a new name. Afterward, you have a custom service updated to match your business requirements.
Extending controllers
Similar to changing services, you can customize the controller to connect to one or more different services:
<!--script src="js/app/cart/controllers/cart-ctrl.js"></script-->
<script src="js/app/cart/controllers/cart-ctrl-custom.js"></script>
For instance, a cart module is updated with a customized controller and a service, but it still uses the same directive behavior:
<!--script src="js/app/cart/controllers/cart-ctrl.js"></script-->
<script src="js/app/cart/controllers/cart-ctrl-custom.js"></script>
<script src="js/app/cart/directives/cart-auto-toggle.js"></script>
<script src="js/app/cart/services/cart-rest.js"></script>
<!--script src="js/app/cart/services/cart-service.js"></script-->
<script src="js/app/cart/services/cart-service-custom.js"></script>
<script src="js/app/checkout/checkout-index.js"></script>
Again, you can name the files anything that makes sense for your project. You can see how to mix your customizations to take place at many levels.
Extending directives
The behavior of visual components is also extensible. You can compose and decompose them to meet your business requirements. Using the customer details example, there is a directive called customerDetails. Its purpose is to show the details of a customer such as name, email, password and etc. This directive requires customer's account provided to it as an attribute. It can be included in your HTML code with this simple line of code:
<customer-details account="account"></customer-details>
Similarly, you can add as many directive behaviors as needed.
Extending routes
To add a new view, extend the router.js file. The following example is a search result module that links the search-list.html file to the SearchList controller:
.state('base.search', {
    url: '/search/:searchString',
    views: {
        'main@': {
            templateUrl: 'js/app/search/templates/search-list.html',
            controller: 'SearchListCtrl'
        }
    },
    resolve:{
        searchString: function ($stateParams) {
            return $stateParams.searchString;
        }
    }

})
The new view can be called from the HTML file with ui-sref="base.search() or from the JavaScript with the $state.go(base.search); command.
Conclusion
You can mix and match the extensibility of the storefront at many levels of the architecture. This is optimal because it not only enables you to build out your e-commerce site to meet your acceptance criteria, but it also gives you the proof of concept in composition that can be used to prove a variety of features. In addition, working within this hierarchy gives you the ability to merge with an updated storefront branch at any time in the future if you want to include new features or modules. Once you are satisfied with your customizations, the storefront overrides can be completely removed at any time.
Extensibility in YaaS
You can extend many YaaS services to meet your own needs in four different ways:
This extensibility framework allows you to extend and scale the functionality of your services without major rewriting of code or architectural changes.
Background information about extensibility in YaaS
The following topics give more detailed background information and examples of extensibility in YaaS for data structures, Builder module implementations, and the storefront application.
Mixins
The mixins feature can help you to define a set of properties once and then reuse them in many different products. You can use mixins to add additional data to suit your needs. For example, you can use mixins to add additional attributes to products that do not exist in the Product service, or add additional custom fields to customer information in the Customer service. You can assign one mixin to many products, and you can also use many mixins in one product. This approach supports flexibility, re-usability, and structural consistency among all your products. You can use mixins with numerous YaaS services, including the Product, Order, Customer, and Site services.
Following is a basic process flow for using mixins:
Define your schema using JSON and store it in the Document repository.
{
"$schema": "http://json-schema.org/draft-04/schema#",
"type": "object",
"properties": {
    "message": "text",
    "numberOfCores": "integer"
}
}
Add your schema reference as metadata and submit the data with the payload.
{
  "name": "Smartphone Sony Xperia Z2",
  "description": "The world's best camera and camcorder in a smartphone.",
  "sku": "SonyXperiaZ2_123",
  "metadata":{
     "mixins":{
        "additionalInfo":"https://api.yaas.io/hybris/schema-repository/b1/single/additionalInfo_v1"
     }
  },
  "mixins":{
     "additionalInfo":{
        "message": "Waterproof smartphone",
        "numberOfCores": 4
     }
  }
}
Mixin tutorials
The following tutorials give step-by-step examples of how to use mixins in various YaaS services.
Using mixins in the Document service
Using mixins in the Product service
Using mixins in the Order service
Using mixins in the Customer service
Using mixins in the Site service
Using mixins in the Cart service
Plug-ins
You can customize the cart and checkout flow using plug-ins to seamlessly incorporate external service providers. YaaS supports plug-ins to calculate taxes, find shipping options, and process payments. For example, you can find a Stripe plug-in for payments and an Avalara Tax plug-in for tax calculation on the YaaS Market. To integrate with other third parties or develop your own logic, you can develop plug-ins yourself by implementing the respective REST API/interface and configuring your service using the Site service.
Following is a basic process flow for using plug-ins. This example shows how to set up a plug-in for the Avalara Tax service:
Implement the interface.

Set up the plug-in in the Site service.
{
 "id": "AVALARA",
 "name": "Avalara Tax Service",
 "serviceType": "urn:x-yaas:service:tax",
 "serviceUrl": "http://avalara-b1.prod.cf.hybris.com",
 "active": true,
 "configuration": {
   "restricted": {
     "license": "Your Avalara license key",
     "url": "https://development.avalara.net",
     "apiVersion": "1.0",
     "account": "Your Avalara account ID"
   }
 }
}
Mashups
You can use mashups to implement custom logic that spans several services. A mashup combines information from multiple sources into a single new service and/or calls different services for complex operations. For example, a checkout service in a storefront is a mashup service because it utilizes information and uses functionality from multiple services, such as the Product, Price, Cart and Order services.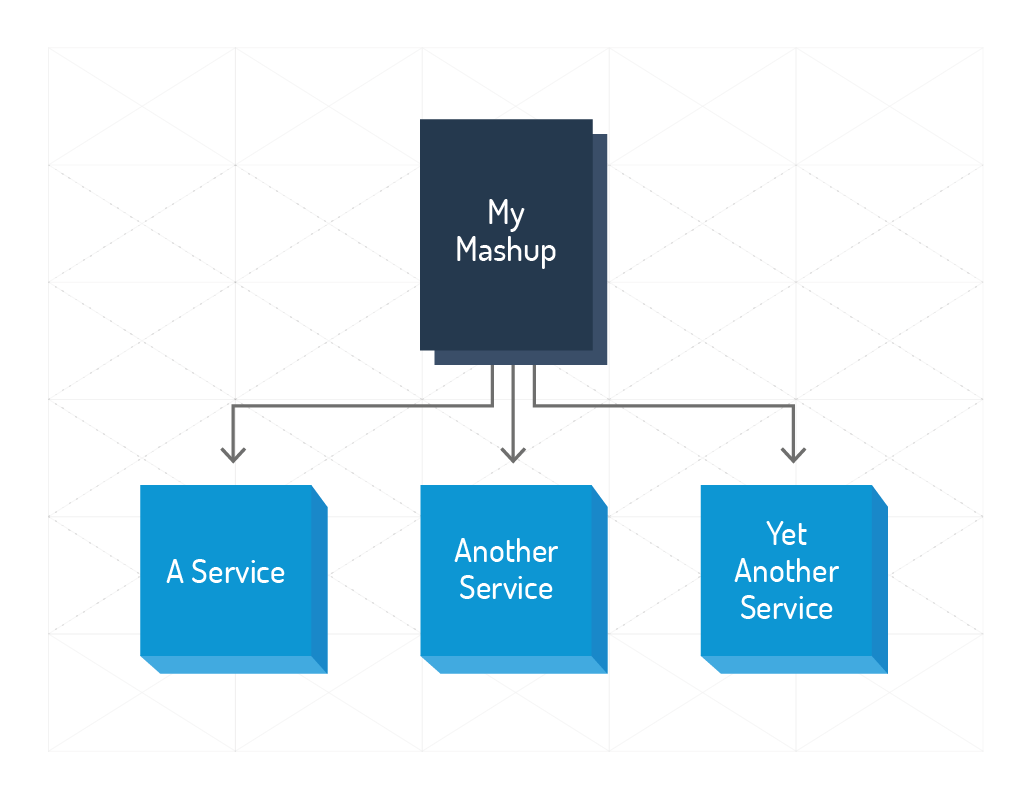
Events and the PubSub service
You can orchestrate the behavior of multiple services using messages and events that are managed in YaaS by the PubSub service.
The PubSub service enables applications on the YaaS platform to integrate using asynchronous message-based communication. Messages exchanged through the PubSub service typically represent information about business events, such as an event in which a commerce order is created. The PubSub service serves as a message bus.
Using the PubSub service, multiple messaging channels can be established, one dedicated for each business event type exchanged. Hybris SAP refers to these message channels over which applications communicate as channel-specific events or topics. This enables you to add custom logic to existing services, such as triggering additional actions whenever your service retrieves an order-created message.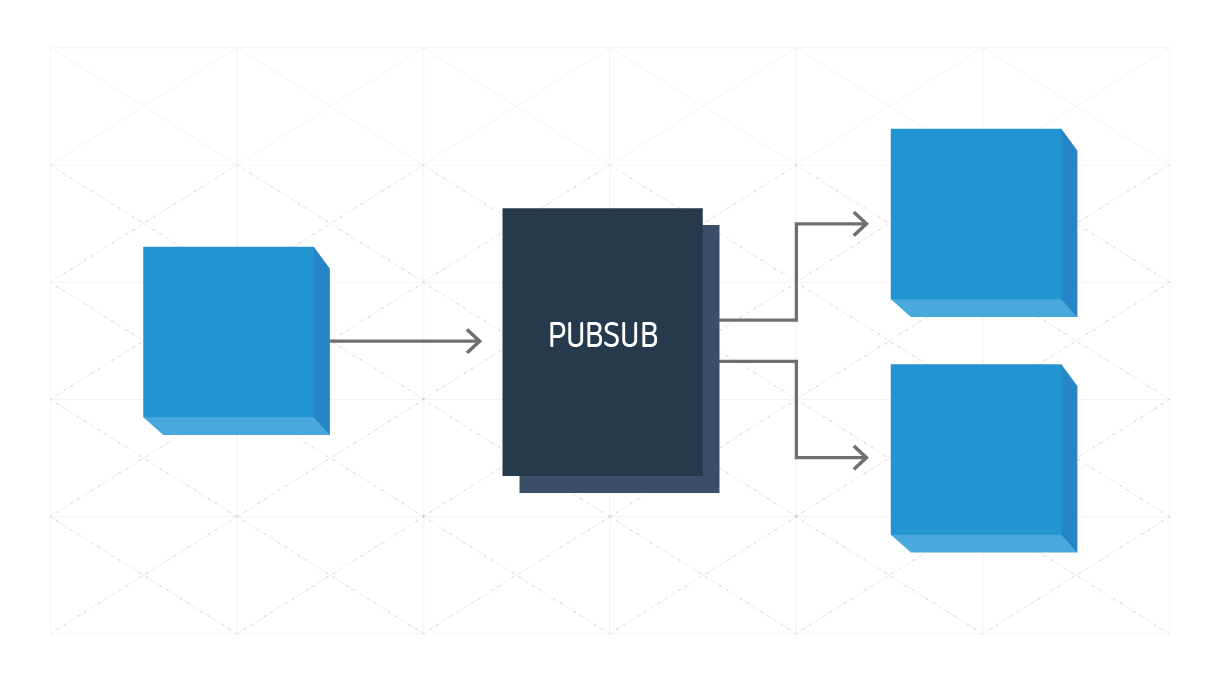
If you find any information that is unclear or incorrect, please let us know so that we can improve the Dev Portal content.
Use our private help channel. Receive updates over email and contact our specialists directly.
If you need more information about this topic, visit hybris Experts to post your own question and interact with our community and experts.