
There are many new features and exciting changes in the Builder. Included in these release notes are examples of how to do the following:
- Create an organization
- Get started with teams
- Create a package
- Test your package
- Share with the community
- Set up a project
Create an organization
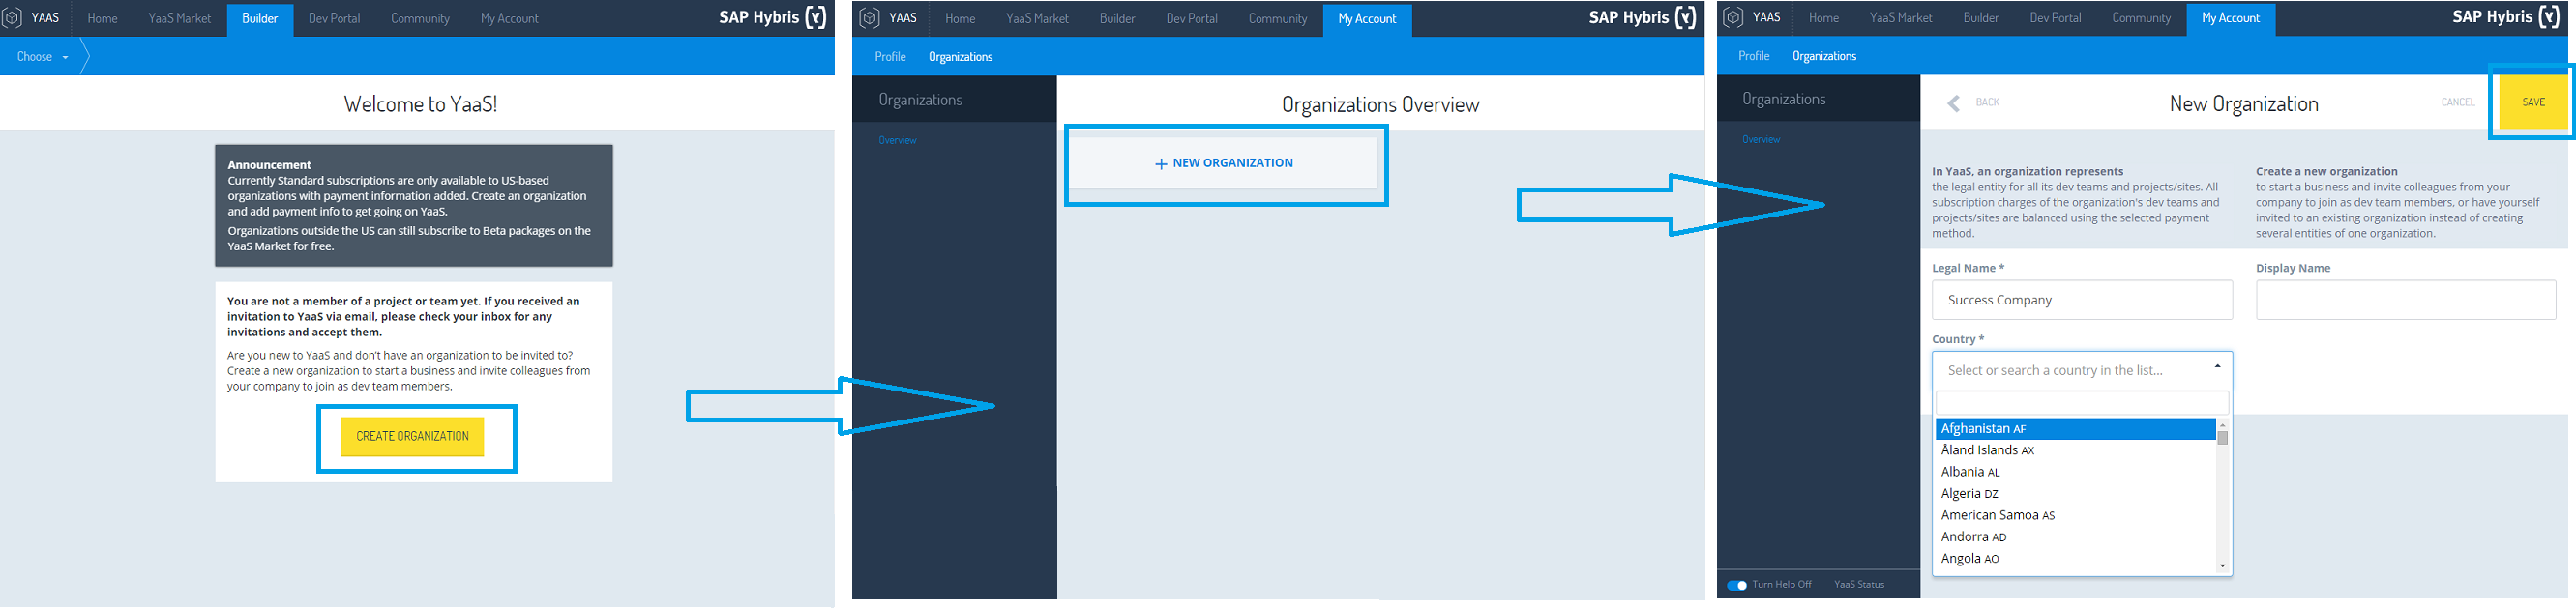
If you are new to YaaS, you only see one option when you log into the Builder - a yellow button that enables you to create an organization. To start your own organization, proceed with the steps below. Otherwise, if you are invited to an existing team or a project, click on the link in the email you received to accept the invite.
- Click on + NEW ORGANIZATION in the Organizations Overview window. Input your organization's legal name, the display name, and select the country where your company is located:
- If you choose the United States, then you must also accept the Framework Agreement, since this is the only country that is able to subscribe to commercial packages on the YaaS Market. The approval process for your USA organization requires you to add business-relavant data using the step-by-step wizard. As shown below, set the base path, the company address, billing address (if different), a contact person responsible for the organization, and a payment method (at the moment credit cards only):

Once you complete this process and send the data for approval, the status is set to pending. You can not subscribe any packages during this phase until your organization is set to approved.Your organization needs to go through some background checks - this may take a couple of days. As soon as your organization is approved, an email is sent to the contact person, and the change is reflected in My Account > Organizations > [Your Organization], as shown in the example below:
- Organizations from countries other than the United States can only subscribe to Beta packages, and therefore, do not need to sign any terms of use. If your organization is not located in the USA, then the approval process is really simple. Click the Get Approval button and input the base path, as shown in the example below. The base path is needed for all the services created within this organization as well as it will be displayed in URLs. SAP hybris reserves the right to change the base path if it is not conform with your organization. After you click the Save button, your organization is auto-approved, and you can subscribe to the Beta packages offered on the YaaS Market:
 Once the approval process is complete, you can not modify or add any data regarding your organization.
 - To invite other members to your organization go to Administration > Organization Members and click on + NEW ORGANIZATION MEMBER. Enter the email address and role for the team member, then click on the Invite button:

The new member needs an account in YaaS and has access to your organization immediately.
Getting started with teams
- If you have a role that is allowed to create teams and projects within an organization, the + NEW DEV TEAM button is visible in the Builder. Click on it, enter the information in the required fields as shown in the example below, and click on Create:
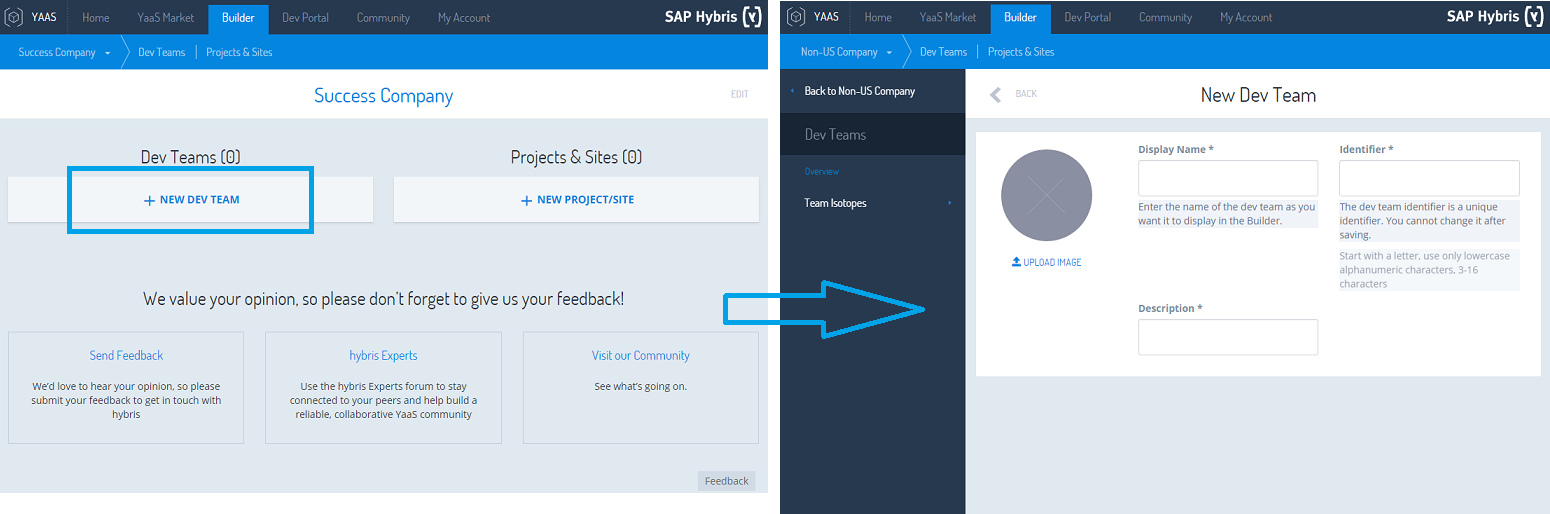
Some fields can be changed after creation, and some, such as the Identifier, can not be changed, so be careful when choosing one. - The newly created team is shown on the dashboard when you select the appropriate organization in the upper left corner. If you are a member of more than five teams and do not see the team you want to access on the dashboard, click on the Dev Teams button in the upper left navigation. A list of all your teams is displayed, ordered by teams you created and teams you are invited to join. Click on a particular team to see the details:

- Within a team, you can register the services and Builder modules that you develop and deploy. You can also bundle them into packages, as seen in the next example, and sell them on the YaaS Market (in the future). Team members can be assigned a user role that is allowed to subscribe to packages - by default the creator and owners can do that -, developers on your team can use the services that are offered in those packages, and your services can call those subscribed-to services. The packages your team subscribes to is listed under the Subscriptions navigation node, and the usage data is on the subscription details page.
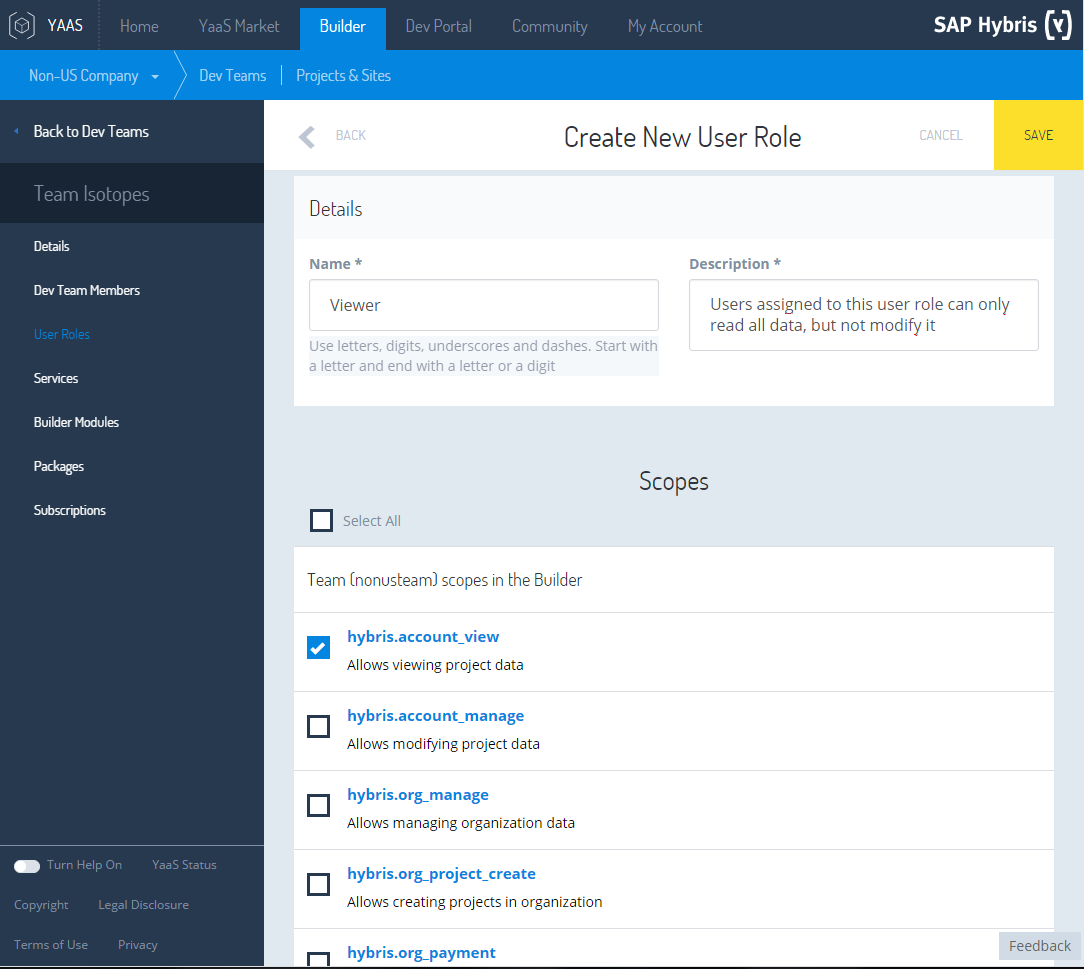
- Under the User Roles navigation node, define different roles and then assign different team members to those roles. Click on the + NEW USER ROLE button, and enter the name and the description of the new user role. Choose which actions can be performed by a member of this role in the Scopes section, and click the Save button to create the new user role:
Invite users directly to this user role when you invite new team members to your organization, or go to Dev Team Members and click on + DEV TEAM MEMBER. Enter the email address and role for the team member, then click on the Invite button:
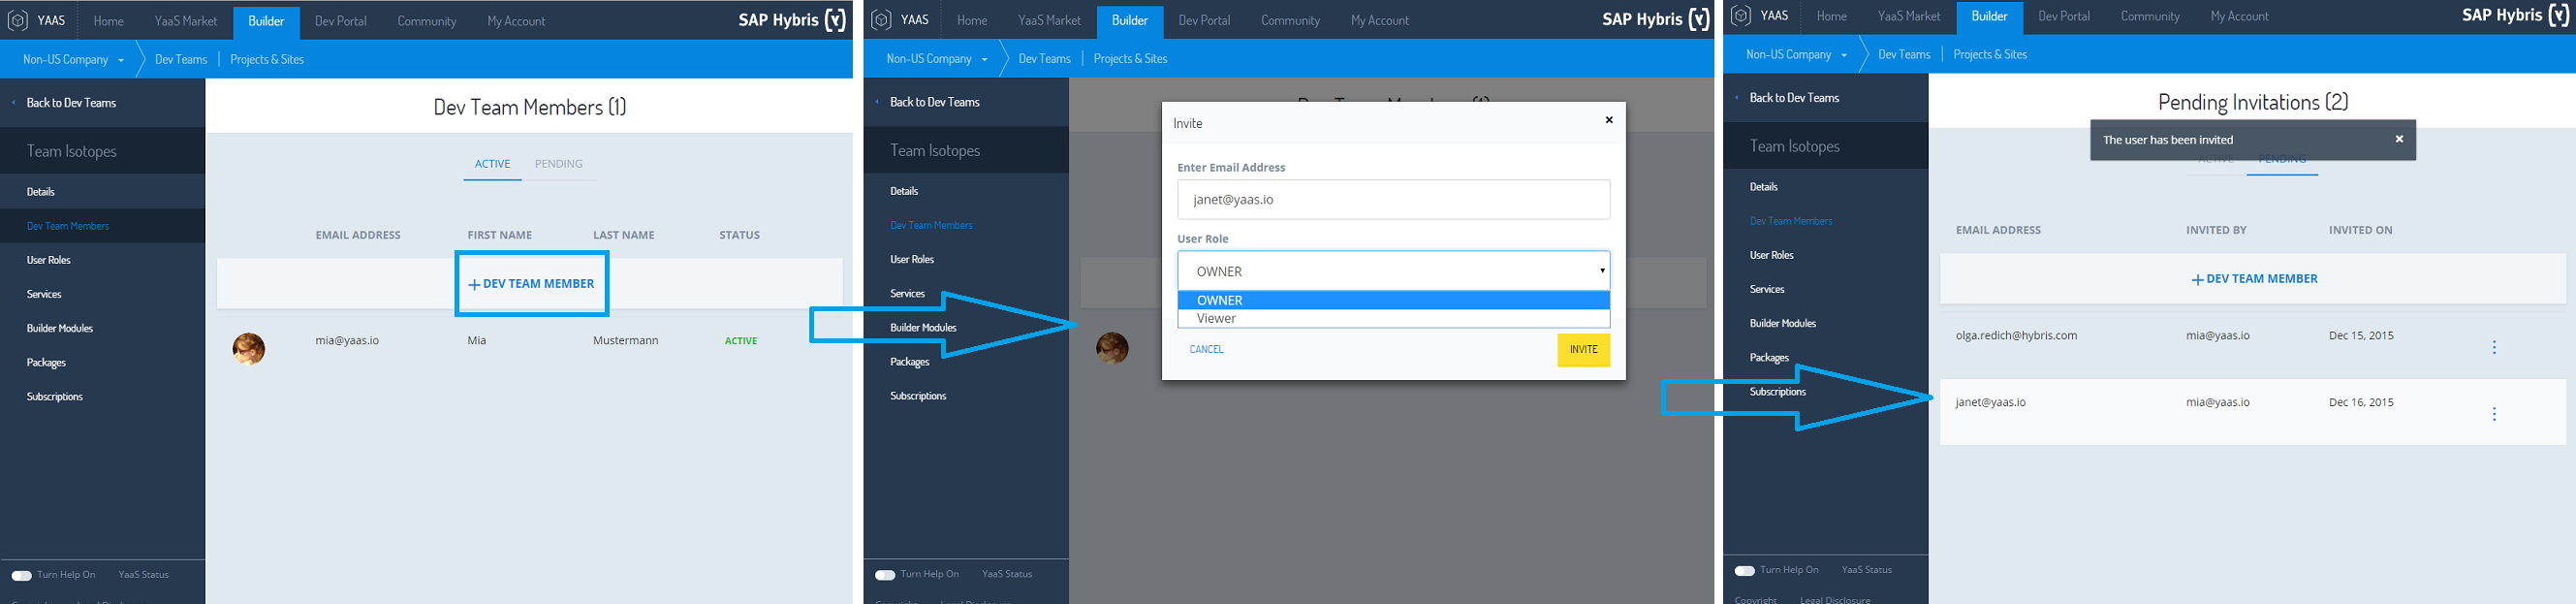
An invite is sent in an email to the new team member and they can access the team after they accept the invitation. You can see the invite in the Pending Invitations window until the invitation is accepted.
Create a package
- A team's ultimate goal is to create packages and sell them on the YaaS Market. Publishing will only be available in the future, but you can already prepare and try your packages internally. To do so, go to [Your Dev Team] > Packages > + NEW PACKAGE, enter the name of the package, and click on the Save button.
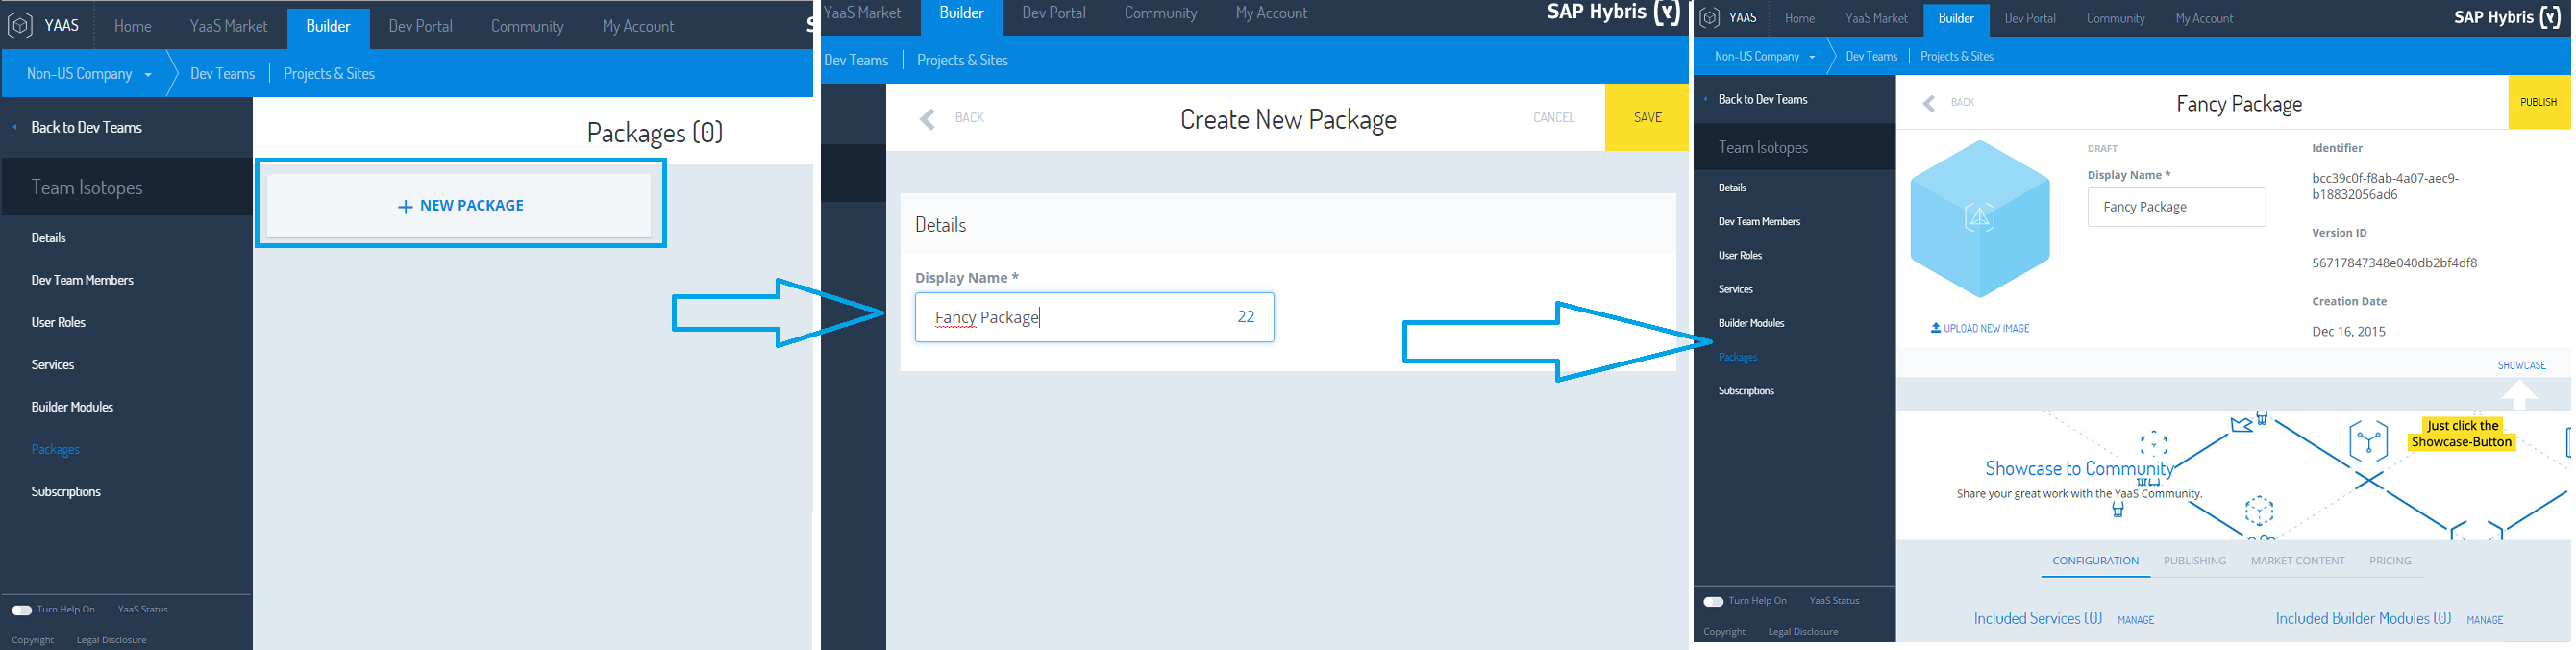
- On the package detail page, enrich your team's package with more services and Builder modules. In the Configuration tab, add these options to your package by clicking on the appropriate link and following the instructions, as shown in the example below:

If the service(s) you add to your package are using services that are not located in this package, then modify the required packages section as well. Add all the packages which contain those services that are called by your service.
In the PUBLISHING tab, add the Terms of Service as a PDF file or URL. These terms are acknowledged by anyone who subscribes to your package and uses it. Enter your company's web address, and a responsible person from your team who can be contacted by the YaaS Market operator in case questions arise:
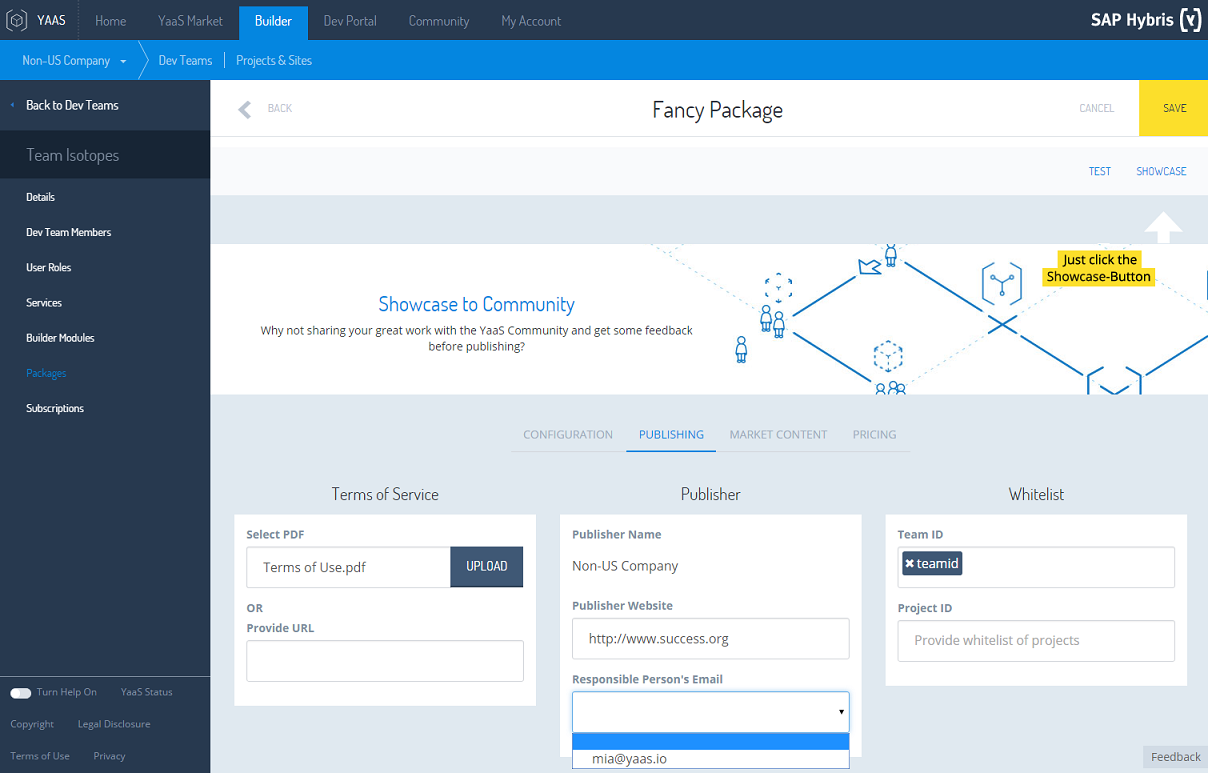
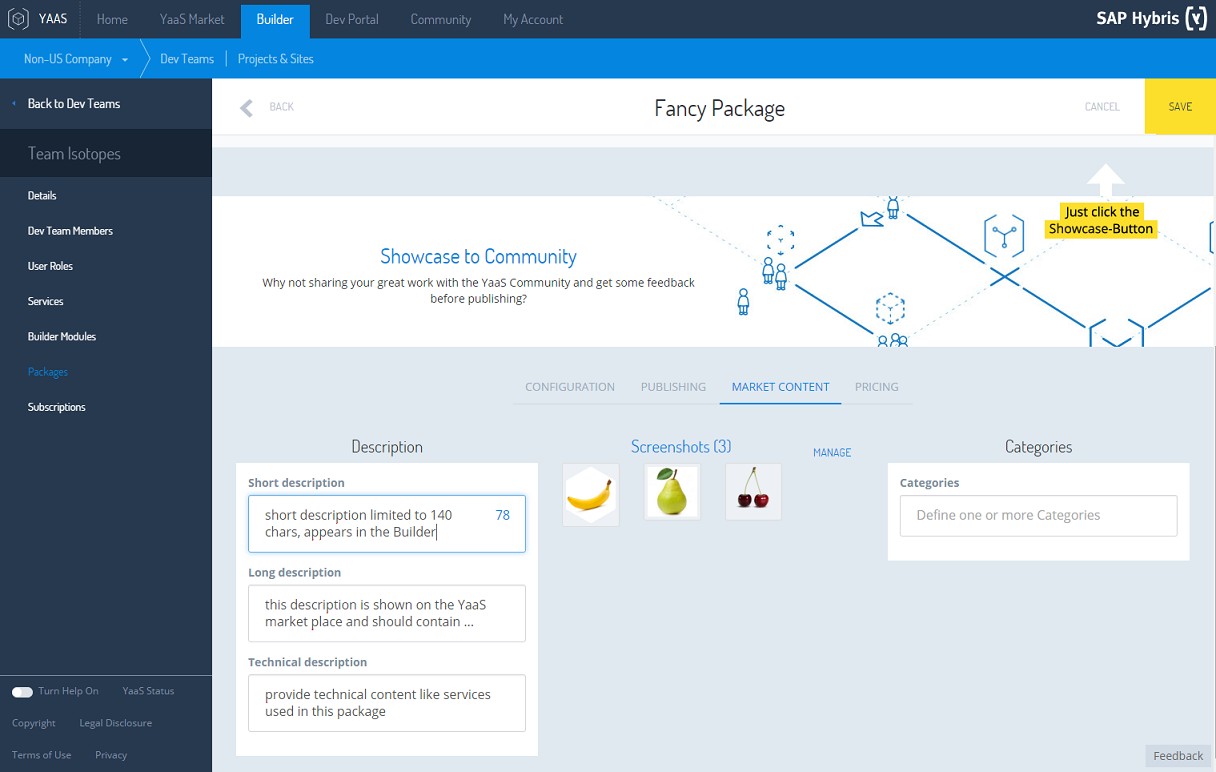
You can also Whitelist teams and projects that can use your package without subscribing to it on the YaaS Market by entering the Team or Project ID in the appropriate field. Those teams or projects can add your package as a private package in the Subscriptions section.In the MARKET CONTENT tab, provide all the necessary data to successfully market your package. The short description is used wherever your package appears in any list in the Builder. The long and technical descriptions are shown on the YaaS Market. Optionally, add some nice screen shots to entice your customers:
In the last tab, called PRICING, select the Package Type: Beta or Commercial. Define the Rate Plan which depends on the package type. For the Beta type, define the Metrics and the usage is blocked after the included quantity of units is used.
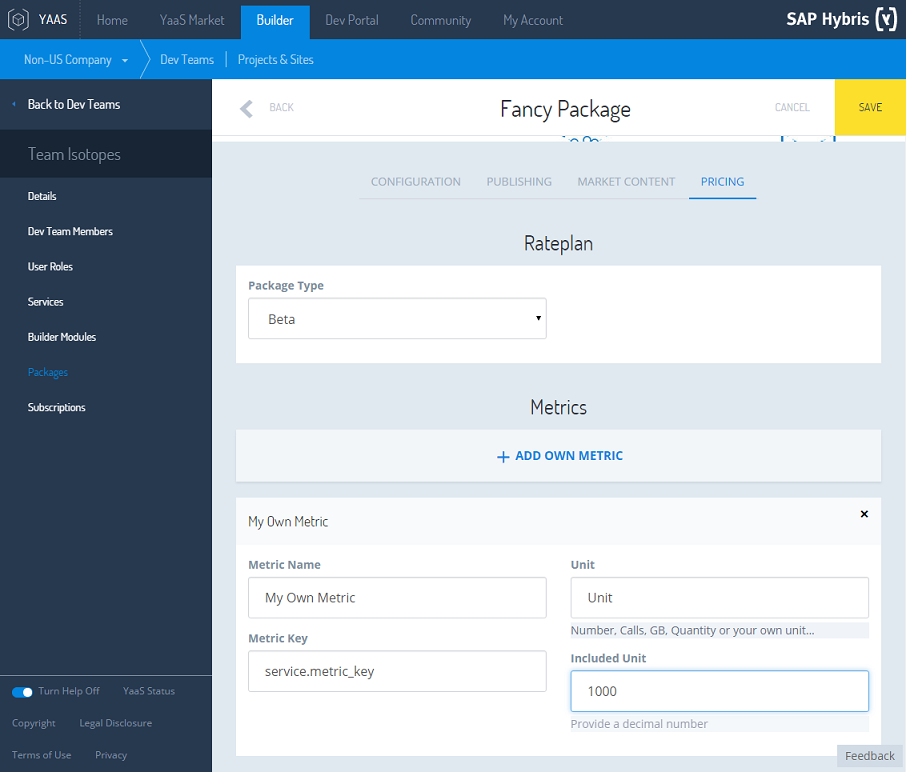
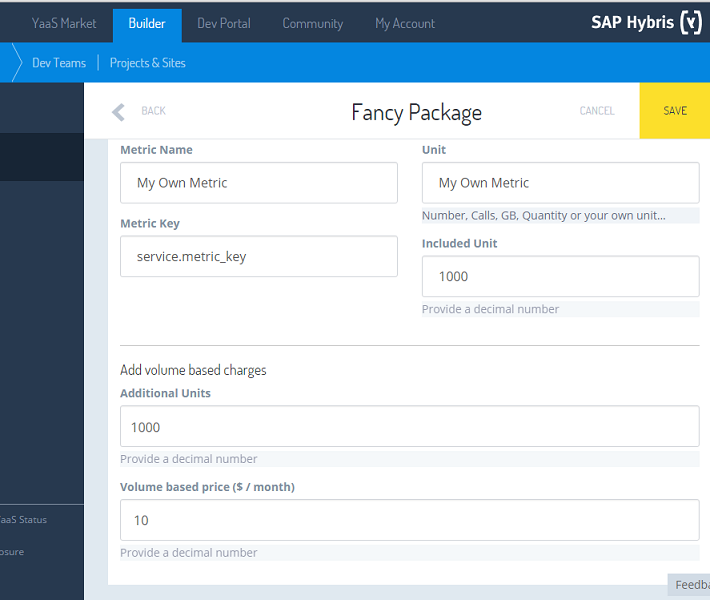
For the Commercial type, you can set a price for any additional usage. Once the included volume is consumed, payment is made for each additional quantity used, as defined.
Test your package in a test project
After you add at least one service to your package, the TEST button appears below the package details. To test a package before you publish it, make sure to add the following details:
- Add an icon
- Set a responsible person
- Define at least one metric
Then click the TEST button and provide the required data, such as the unique identifier of the test project:
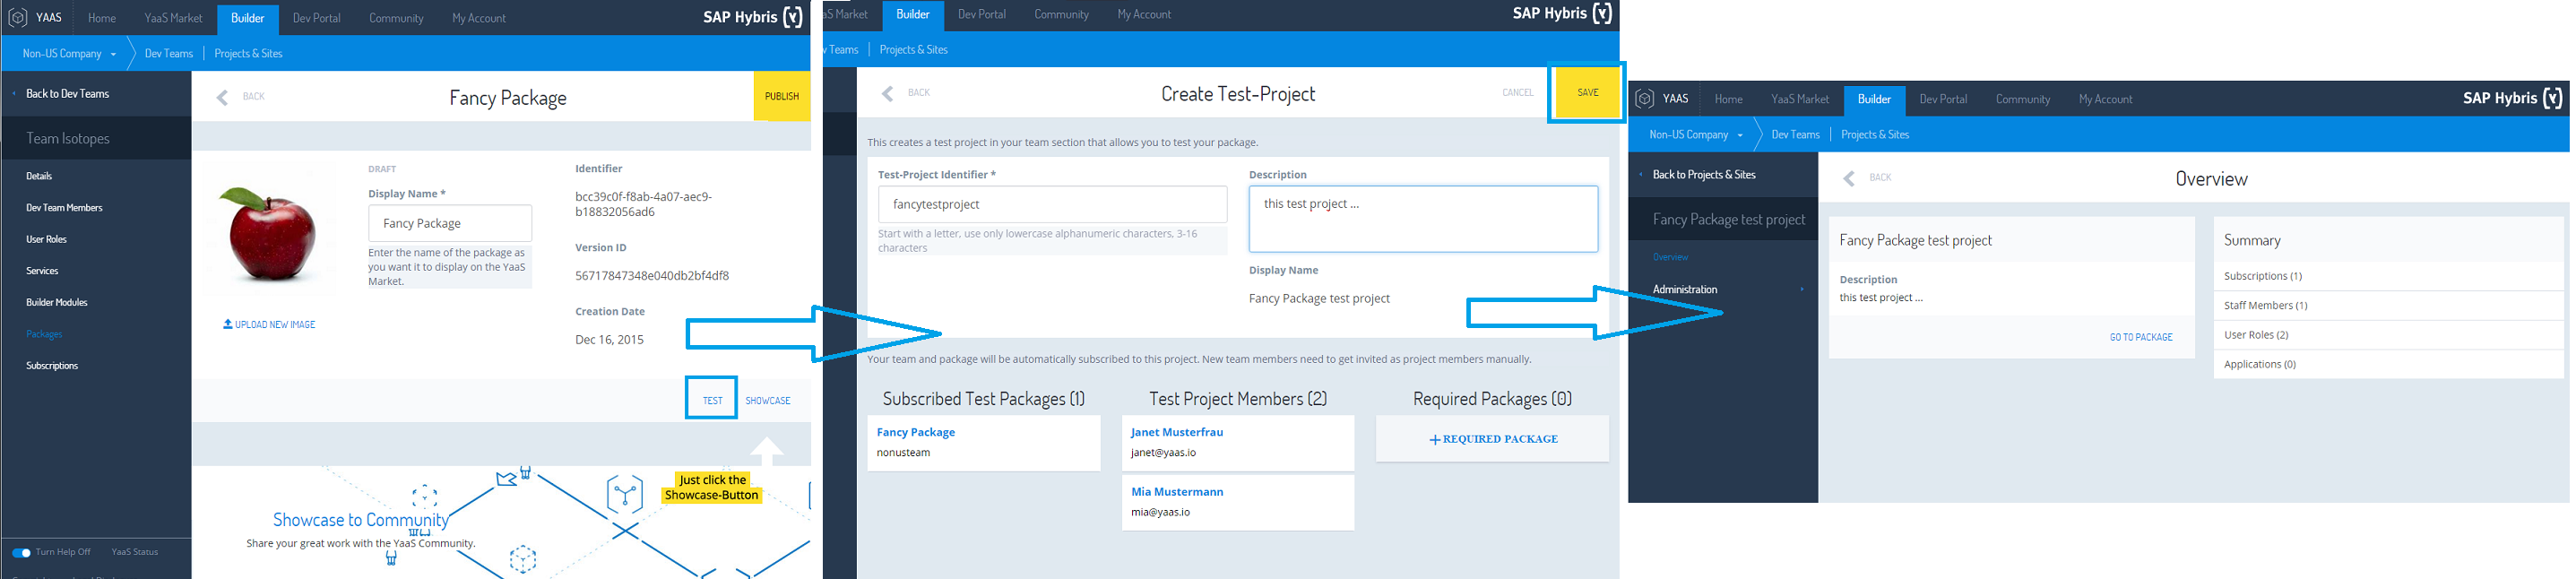
- Click on the Save button and a test project is created automatically. All team members are added as test project members, and a subscription is made between your package and the test project. Access the test project either on the package details page or under the Projects & Sites navigation node:

- You can now start testing the functionality of your service(s) and Builder modules.
Share with community
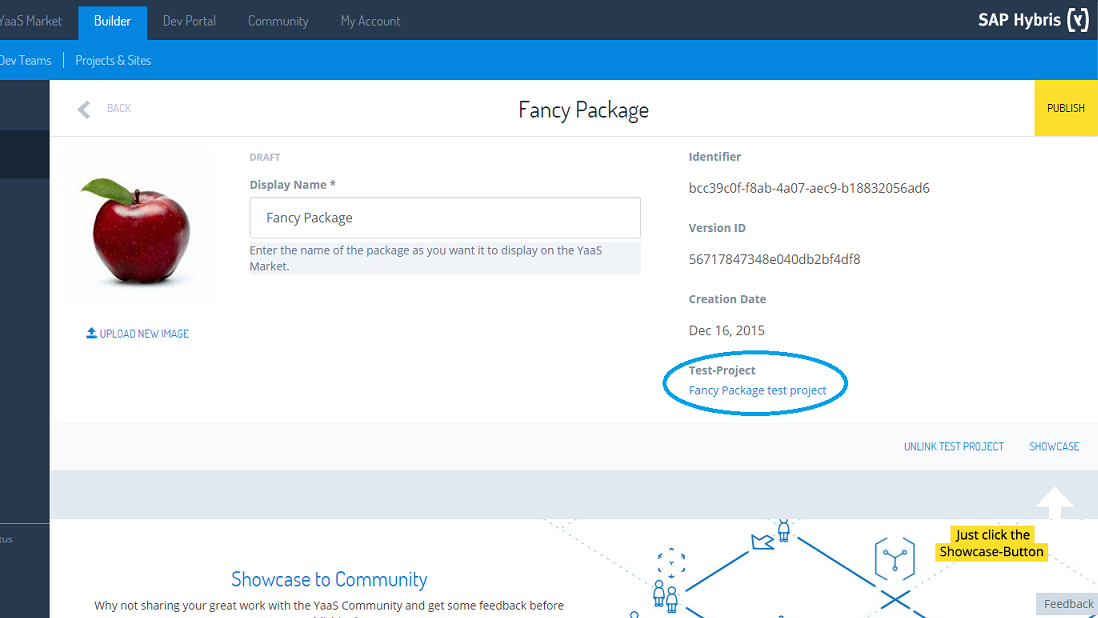
The YaaS Community is a place to showcase your projects and business applications to a broader audience. Click on the SHOWCASE button and review the information from your package, or make any desired changes, such as uploading a new icon.
Click on the Share & Save button and you own project space is created under the URL, https://community.yaas.io/.

Setting up a project
- If you haven't been invited to a project, you can create one if your user role has the permissions to do so. If so, you see the + NEW PROJECT/SITE button, as seen in the example below. Enter the Display Name, Identifier (which cannot be changed later), and the Description. Then click the Save button:

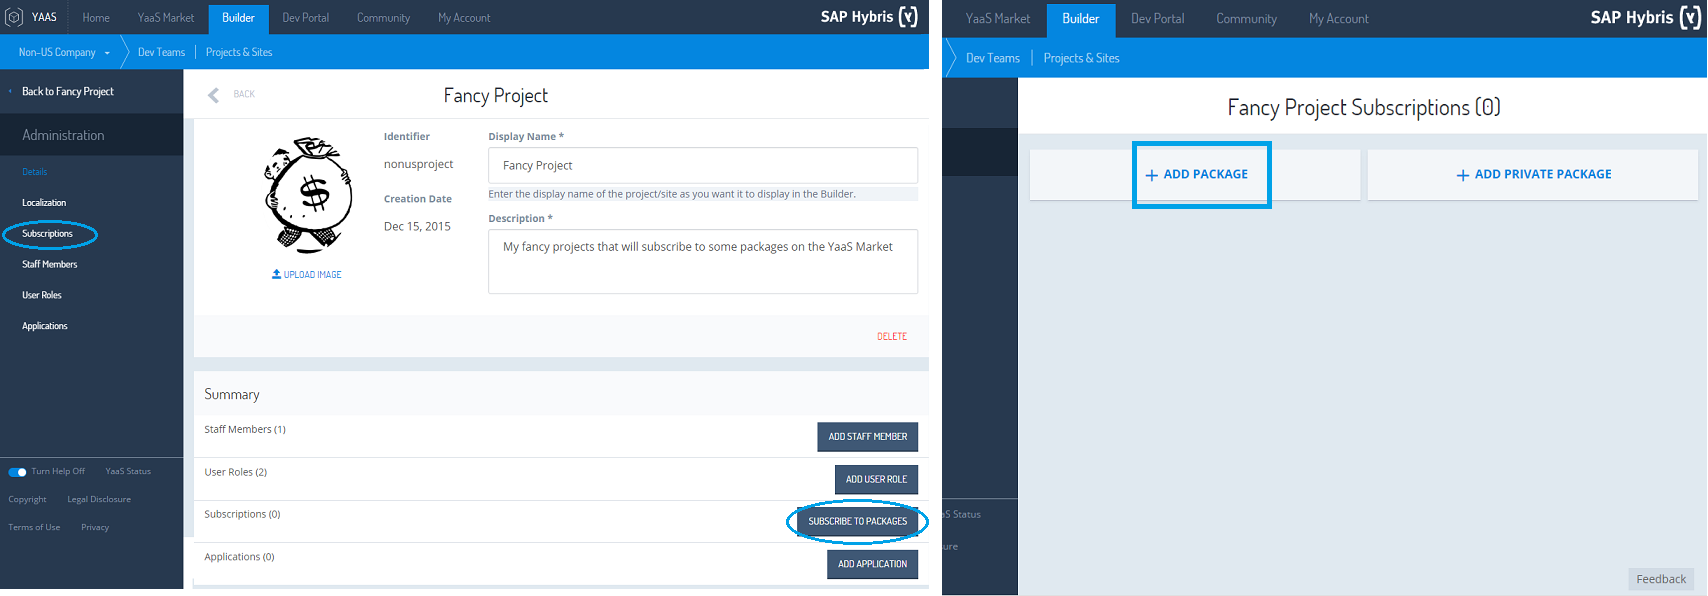
- You can invite other members to your project, and create user roles and assign them to different users. You can also subscribe to packages on the YaaS Market at the URL: https://market.yaas.io/. Or, if you are logged into the Builder and select to add packages, you are automatically forwarded to the YaaS Market within the context of your organization and project. Go to Administration > Subscription or click on the SUBSCRIBE TO PACKAGES button on the project details page, and then click on the + ADD PACKAGES button. You can choose from many packages on the YaaS Market.
- The packages on the YaaS Market are divided into two categories, based on your company location:
- Standard – United States only
- Beta – Worldwide
The Standard packages are available only to US-based companies while the Beta packages are available to all other companies except for US. First, your organization must go through an approval process before subscribing to packages, as described in the example above.
Click on a package to see its details, and then subscribe to it by clicking on the SUBSCRIBE NOW button. If redirected from the Builder, your project or team information is preset in the window. Confirm the subscription is for the project listed, and then click on the SUBSCRIBE NOW button. You can subscribe to more packages, or click on the CONFIGURE IT button:
- Once you're directed back to your project in the Builder, you'll see the navigation tree on the left has changed to reflect that each subscribed-to package containing a Builder module now has navigation nodes:

For example, the PRODUCT CONTENT package offers the possibility to create products and publish them in an online shop. After subscribing to this package, go to the Products tab in the Builder, and click the + ADD PRODUCT button. Enter all the product information and click on the Save button.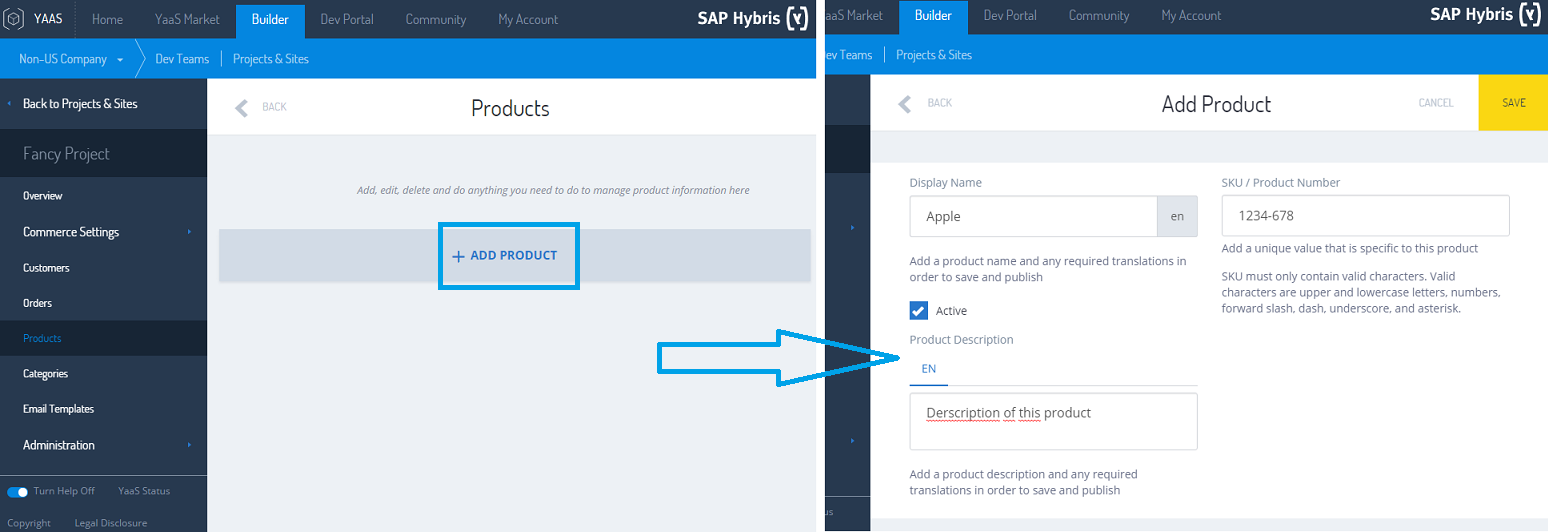
All of your created products are located in the Products tab, and you can sort by the newest, or alphabetically from A-Z, or from Z-A. When you subscribe to the Product Content package, an online shop is automatically created at the URL: http://shops.yaas.io/[Your-Project-Identifier]. The project identifier is located on the project details page. Every product set to Active on the product creation page or on the product details page in the Builder, appears in the online shop immediately: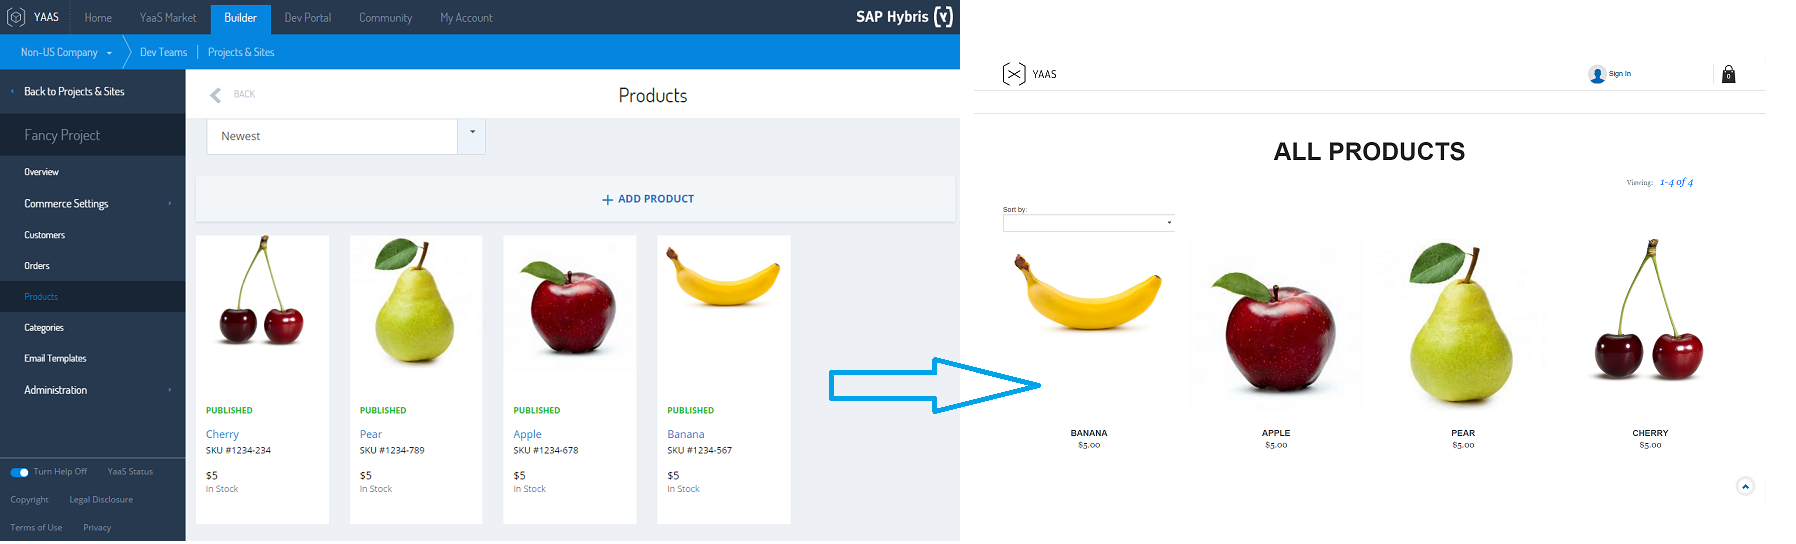
As you can see, the Builder is a powerful tool that lets you do many things in YaaS. There are more changes and improvements on the way, so check back here for the latest updates soon!
If you find any information that is unclear or incorrect, please let us know so that we can improve the Dev Portal content.
Use our private help channel. Receive updates over email and contact our specialists directly.
If you need more information about this topic, visit hybris Experts to post your own question and interact with our community and experts.